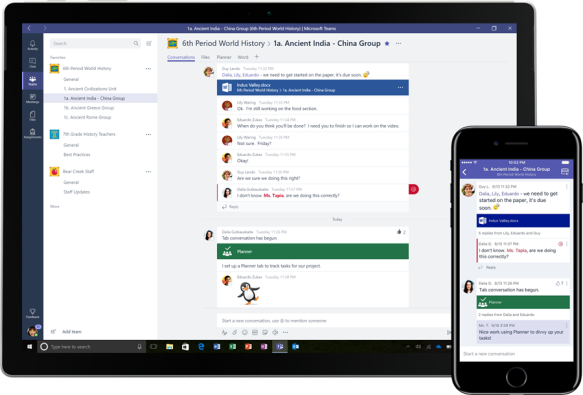
What’s new in Teams for firstline workers

Microsoft Teams has been getting a lot of love lately, not only in EDU (which has gotten a lot of my attention lately), so let me introduce you to some of the recent new features available across most Office 365 SKUs.

Firstline workers can be retail associates, flight crew members, field service workers or in healthcare, often only on mobile, in a busy environment but needing to stay in the know.

Firstline-workers.png

With the needs of firstline workers in mind, Microsoft recently announced a customizable mobile Teams experience, where the end user or IT can choose what apps should be easily available, by pinning them to the navigation bar.

In the above screenshot you can see that channel activities are also available from within Chat, you can choose to enable this new unified chat and channels experience in Settings – General – Show channels in chat list.

If you need to quickly share your location you can now do that from within a chat, just hit the ellipsis (…) followed by Location, a map pops up, zooms in on your location and you get the option to share.

Pro tip! A little mic icon in the lower right will allow you to record and send a voice message.

Another exiting feature is the addition of a module trey with easy access to things like the organization view and files, but also things like Expenses, which to me looks like an integrated line of business app. All of this builds on the idea of Teams as a platform, where you get quick access to your most important everyday tools, to avoid context switching and navigating through multiple platforms.

You can read more about these new features made for firstline workers here, as well as how you can integrate your workforce management systems with new Graph APIs for Shifts, so that your employees can view and manage their schedule right from within Teams…

…and Praise, which is a new tool inside Teams, to keep your colleagues engaged and motivated giving kudos and recognition for their hard work.

That’s it for now, make sure to follow my blog for the latest on Microsoft Teams, and if you have something to add or a topic you would like me to cover, please leave a comment below.


New year news in School Data Sync

Read on to learn about all the new features coming to School Data Sync, like Parent Contact Sync, new EDU Security Groups, updated Section Usage Reports and more…

sds

What is School Data Sync?

For those of you who don’t know School Data Sync, it’s a free service in Office 365 for Education that read school roster data from the Student Information System (SIS) and use that data to provision and license users, create class teams with OneNote class notebooks and more. You can read more about SDS in my blog post on how to automate Teams for Education with School Data Sync.

img_0675

Microsoft recently announced a number of features coming to SDS, some of which will allow for new functionality in other services like Microsoft Teams, and some to enhance the admin experience. Let me go through the features one by one.

Parent Contact Sync

Parent sync in SDS is HUGE! Not by itself, obviously, but because it’s the first step in a long-awaited direction. The lack of ways to interact with parents in Teams for EDU has in my opinion been the Achilles heel of the education offering. While you could tweak permissions to allow sharing of parent and guardian links in OneNote class notebooks within Teams, it’s a cumbersome process which require admin permissions.

parents

For this reason alone, many education institutions have seen the need to invest in a learning management system. NowI’m not saying this will be the death of the LMS, innovative players like Skooler will keep adding value with their integrated solutions. But, for some schools, Microsoft Teams for Education will eventually be enough.


EDU Security Groups

EDU Security Groups used to be auto-provisioned in tenants using SDS while licensed with Intune for Education. These Azure AD security groups are however equally useful outside Intune, which is why this is great news!

These security groups are dynamic, meaning they will update as soon as something changes in your student information system. SDS will create groups for all teachers, all students, all teachers at school a, all students at school b etc.

In Intune these could be used in order to dynamically provision MDM policies, apps and more, similar to what I covered in my blog post on Microsoft 365 automation using SDS attributes, Intune & Graph.

Now we’re also able to use these groups for Group Based Licensing, Conditional Access and Scoped Search in Microsoft Teams. For those of you who don’t know Scoped Search, it’s a way to virtually separate users from eachother. Scoped Search use Exchange address book policies in order to hide users in one group from another, meaning you can separate students and teachers from different schools or even different grades, as well as separate students from other staff entirely.

Scoped Search (Address book policies) only provide a virtual separation of users. Users can still initiate communications with others by providing the complete user principal name (most often the email address).

Updated Section Usage Reports

Like the header says, section usage reports in SDS are getting an update. New reports will include synced class attributes, SharePoint usage, member count and more, to help you separate active and inactive class teams. Microsoft host a number of scripts to perform actions based on these reports, over at their O365-EDU-Tools GitHub repository.


And there’s more…

For admins the admin interface is beeing modernized to align with the experience found in the Office 365 Admin Center. There will be a People view in order to view students, teachers and parents, and  a Groups view for schools, classes and security groups synced by SDS.

The backend sync process itself just got improved performance, and in what’s more of a bugfix than a feature, error generation will be reduced to be more accurate. Previously an error on one sync element could produce 10-12 warnings, which was obviously confusing for admins.

That’s it for now, if you wish to stay updated on SDS make sure to also visit What’s new with School Data Sync.

Read only Class Materials in Teams for Education

Every year on BETT, Microsoft announce new prodcuts and/or features related to EDU. This year was no different, let me introduce you to Class Materials.

header.jpg

Microsoft Teams for Education is extremely popular among teachers, but the open architecture of Teams is far from that of learning management systems and other tools teachers are used to.

Consider sharing resources for an upcoming assignment, or a week plan with homework for the coming weeks, only to realize at a later time that a clever student has altered the content, removed all homework or worse…

Introducing Class Materials

Luckily that’s about to change with the introduction of Class Materials!

read only files go here.jpg

Class Materials is a special folder available within the files area of the class team, read-only for students while leaving full permissions for teachers. That’s right, anything the teacher place in that folder stays untouched.

class materials

Let’s create a new document in the Class Materials folder…

new assignment in class materials

…and open in SharePoint.

Class materials in SP.jpgYou can see on the left side there is a section called Class Materials, and on the right there is a Manage access area. Let’s investigate.

If you click Manage access the permission panel will open.

permissions

The owner (teacher) will always have full access while you can see that the members (yellow) only have view access. Also any guests (red) only have view access.

To be fair, this announcement isn’t huge, something similar could already be acomplished by manually tweaking SharePoint permissions. But it’s good to see the platform maturing, Microsoft listens to their customers and Class Materials will definitely make things easier for teachers.


Schedule Teams meetings on a mobile device

Lately we’ve covered how to spin up a quick meeting in a channel using Meet Now in Teams, how to schedule meetings in the web and desktop clients, as well as how to schedule a meeting using the Microsoft Teams Outlook add-in.

Today’s post will conclude the meeting scheduling tutorials, covering how to schedule meetings on your mobile device.

Teams_mobile.png

I use Teams all the time, on my desktop in the office, on my Surface Book 2 as well as on my iPad and iPhone. It’s great to be able to stay connected while on the go, and for a while now we’ve also been able to schedule meetings using Teams on iOS.

Let’s see how that works!

Meeting-view-iOS.jpg

First you need to open the Teams app and choose Meetings to get a view of your upcoming schedule.

For any Teams meetings you will also see the litte Join.jpg button that will take you directly to the relevant meeting.


Schedule-meeting-button-iOS.jpg

In the upper right corner there’s a New event button what will take you to the New event view. You should obviously add a title and add one or more participants.

Notice that Teams fetches the availability of participants in your own organization!

One limitation I found while testing, was that I couldn’t invite anyone external that I hadn’t already interacted with using Teams. Teams would suggest both existing external users, guests and others in my own organization, but it wouldn’t let me enter a random email address to invite someone new from outside my organization.

20181213_200808000_iOS.png

At the time of writing external participants that have been invited as guests appear free, even though there is no way for Teams to actually know that.

You could choose to host the meeting in a channel, which would allow all members of that team to join in. There are obviously also options to set the time and date, whether or not it’s a recurring event, the location and more.

Once you click Done in the upper right corner, the meeting is added to your calendar and a meeting invitation with a link to join the meeting is sent to any participants.

Join-Teams-Meeting-link.jpg

This wraps up the meeting scheduling mini tutorials, I hope you have enjoyed following along, and maybe also learned a thing or two. I plan to cover more Teams topics with mini tutorials like these, if you have a suggestion please leave it in the comments below.

Schedule Teams meetings in Outlook

Last time we went through how to schedule a Teams meeting in the desktop or web app, but since many still rely heavily on Outlook for email communication, calendar and tasks, let’s also have a look at how we can schedule a Teams meeting using the Microsoft Teams meeting add-in in Outlook.

TeamsAndOutlook.jpg

The above icons are part of the beautiful new design, recently announced by Microsoft to Embrace a New World of Work.

Meetings belong in the calendar, so first of all let’s open the Outlook calendar ribbon.

calendarRibbon2.jpg

You should see a section called Teems Meeting and a New Teams Meeting button.

The Teams Meeting add-in should automatically install for users who have Microsoft Teams and Office 2013 or later installed on their Windows PC.

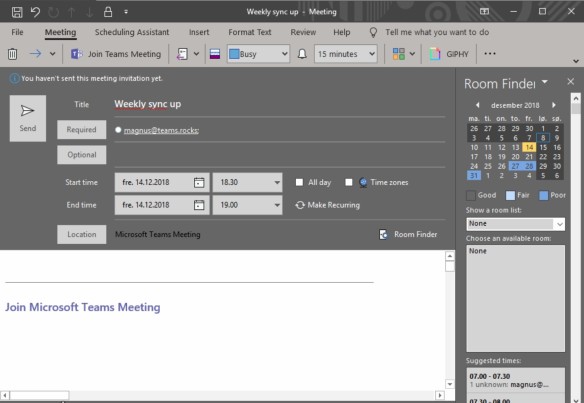
When you click New Microsoft Teams Meeting you get almost the same options as you would with the ordinary new meeting button in Outlook, a few things are however different, like a Join Teams Meeting button in the top ribbon, Microsoft Teams Meeting specified as the location as well as a Join Microsoft Teams Meeting link within the body of the invitation.

outlookInvitation.jpg

Now you just need to hit Send, the invitation should land in both the attendees inbox and their Teams client, and you’re good to go!

Stay tuned for even more mini tutorials, next up is scheduling meetings on mobile.

Schedule a meeting in Microsoft Teams

Last time, in my post Get started with meetings in Microsoft Teams, I explained how you can spin up a quick meeting from an ongoing channel conversation. In this mini tutorial I will focus on a more traditional scenario, where the meeting is scheduled in advance.

calendar-icon.pngThere are multiple ways of scheduling Teams meetings, you could do it from within the meet now functionality covered in my last post, from the mobile apps, from the meetings app in the Microsoft Teams desktop and web apps, or using the Teams meeting add-in in Outlook.

Let’s explore meetings in the dektop and web app!

DayView.png

When you click the Meetings button in the left menu it opens the day view, where you will find any meetings or appointments scheduled in Teams or Outlook. You also have the option to switch to the agenda view in the upper right.

agendaView.jpg

You can easily join a scheduled meeting by clicking Join. If you want to explore the content, who’s invited and more details, just mark the appropriate scheduled event.

meetingDetails.png

To schedule a new meeting, click the Schedule a meeting button below the day or agenda view.

scheduleMeeting.png

Depending on your configuration you will be able choose between a new live event (preview) or a new meeting.

meetingScheduler.png

You can obviously give the meeting a title, choose the time and date and add some details, you could choose to book a physical meeting room, there’s an option to select a channel to virtually host the meeting as well as a scheduling assistant that will compare the calendars of those invited to find a suitable time.

If you choose to host the meeting in a channel members of the team will be able to join.

Once you hit Schedule in the lower right corner the invitation is sent, and the meeting details will open.

meetingScheduled.png

In the lower left you will see the link to the meeting, and depending on your license maybe also a toll free number to call the meeting as well as a conference ID.

Prefer video? Check out Microsofts great 90 second video tutorial on scheduling meetings.

That’s all I have for now, stay tuned for more mini tutorials, next up is scheduling Teams meetings using the Teams meeting add-in in Outlook.

Get started with meetings in Microsoft Teams

This is the first, of what will hopefully be a series of new mini tutorials, explaining simple concepts and features in Microsoft Teams.

The first topic is meetings, I will not cover every aspect of meetings in Teams, or Microsofts vision of Intelligent Meetings, but I will start with showing you how you can quickly spin up a meeting in a channel, using functionality commonly refered to as Meet Now.

MeetNowTop.jpg

Let’s say you work in management of a business school, within your team you have a channel called Insights, and a colleague recently added a beautiful Power BI Dashboard to track things like retention and graduation rates.

BusinessSchoolConversation.jpg

There is an ongoing discussion about these insights in the conversation tab, but you feel like kicking of a quick meeting to go more in depth. Just hit the meet now icon in context of the conversation!

MeetNow.png

A video preview will launch, and you will have the option to add a subject, turn video on or off, switch to another camera or open the meeting scheduler if you deside to pick this up at a later time.

MeetNowStarts.jpg

If you hit the Meet Now button the meeting will start, you will see the others from the conversation in the participant pane on the right, and you can click any name to have the meeting call that person.

MeetNowAlone.png

You can add any team member to the meeting using either suggestions or search in the participant pane.

Depending on your configuration you will have lots of options available for things like recording or desktop sharing, but let’s save those for an upcoming mini tutorial.

Adding apps & tabs in Microsoft Teams using Graph – part 1

In part one of this two part tutorial I will show you how to add tabs within your channels in Microsoft Teams, using the Graph APIs. In part two I will also cover how you can automate the procedure using PowerShell, allowing for scenarios where you need to bulk add tabs to a large set of teams.

microsoft_graph

Microsoft Graph

First things first, what is Graph? Microsoft Graph is the gateway to data and intelligence in Microsoft 365, and allow applications to access digital work and digital life data across the intelligent Microsoft cloud (Source: Microsoft).

Sound great, but what does it really mean? In short it’s a set of REST APIs we can connect to in order to programatically interact with services within Microsoft 365, whether it’s to get meetings and calendar data from Exchange, mobile device status from Intune or feedback and grades from assignments in Microsoft Teams for Education.

Technically Microsoft has multiple Graph APIs, or endpoints, like the Intelligent Security Graph, the education API, Office Graph and more, but we can easily interact with them simultaneously, as well as use data from one in the other, so lets refer to Microsoft Graph as an entity going forward.

Like the title says, we’re going to focus on adding tabs within Teams today, a feature, or possibility if you will, announced at Microsoft Ignite 2018.


Who needs to add tabs programatically?

In many if not most cases, teams are setup and managed largely by team owners. But there are organizations that combine tools like Forms or PowerApps with Flow, in order to govern the team creation process using a request form. Others bulk create teams using the Microsoft Teams PowerShell module, and sectors like education have tools like School Data Sync to automate the teams lifecycle.

In those scenarios the team is created for the owner, often pre-populated with relevant members, and we might like to prepare it with a set of predefined channels, apps and tabs.


Getting the IDs

Microsoft love IDs, whether they’re called globalIDs, groupIDs or teamsAppIDs, and I’m sure also great ideas.

In order to add a tab, we first need to get the teams ID, the channel ID, and we need some info about the tab we’re adding. A great way to get started with Graph is using the Graph Explorer, so lets use that and see if we can find some of those IDs.

You must first login to the service, then modify the permissions (either according to the documentation or just add everything), and finally choose beta.

Graph_logon.png

This worked at the time of writing, but since these APIs are still in beta there might have been changes by the time you read this and they might have been moved into production (v1.0).


Lets first run a GET to see if the logged on user has any team memberships.

GET https://graph.microsoft.com/beta/me/joinedTeams

Response:
{
    "@odata.context": "https://graph.microsoft.com/beta/$metadata#groups",
    "value": [
        {
            "id": "74bacc8d-dd90-4b5a-aba2-72cf9c044eea",
            "displayName": "GraphTeam",
            "description": "GraphTeam",
            "isArchived": false
        }
    ]
}


We can see this particular user is a member of one team caled GraphTeam, and we also get the teams ID. Lets use that and see if there are any channels in that team.

GET https://graph.microsoft.com/beta/teams/74bacc8d-dd90-4b5a-aba2-72cf9c044eea/channels/

Response:
{
    "@odata.context": "https://graph.microsoft.com/beta/$metadata#teams('74bacc8d-dd90-4b5a-aba2-72cf9c044eea')/channels",
    "value": [
        {
            "id": "19:3244b3fd6f8a42d390a79706b68678f1@thread.skype",
            "displayName": "General",
            "description": null
        },
        {
            "id": "19:d6789651b4704d2db79c9f76a13009c2@thread.skype",
            "displayName": "Channel1",
            "description": null
        }
    ]
}


You can see the ID was added to the query, as well as /channels/ since that is what we’re after, and we get two channels in return; General and Channel1. Again we’re getting the IDs, let’s choose General and see if we can query for tabs.

GET https://graph.microsoft.com/beta/teams/74bacc8d-dd90-4b5a-aba2-72cf9c044eea/channels/19:3244b3fd6f8a42d390a79706b68678f1@thread.skype/tabs

Response:
{
    "@odata.context": "https://graph.microsoft.com/beta/$metadata#teams('74bacc8d-dd90-4b5a-aba2-72cf9c044eea')/channels('19%3A3244b3fd6f8a42d390a79706b68678f1%40thread.skype')/tabs",
    "value": [
        {
            "id": "0d042444-0c01-4fbd-afb8-2f936f7ba751",
            "name": "Wiki",
            "teamsAppId": "com.microsoft.teamspace.tab.wiki",
            "sortOrderIndex": "10000",
            "webUrl": "https://teams.microsoft.com/l/channel/19%3a3244b3fd6f8a42d390a79706b68678f1%40thread.skype/tab%3a%3a3accd260-ec69-43c8-8130-3908c1fbe02d?label=Wiki&groupId=74bacc8d-dd90-4b5a-aba2-72cf9c044eea&tenantId=6ac1a27f-51d8-47e6-8485-5ee4f0e58fee",
            "configuration": {
                "entityId": null,
                "contentUrl": null,
                "removeUrl": null,
                "websiteUrl": null,
                "wikiTabId": 1,
                "wikiDefaultTab": true,
                "hasContent": false
            }
        }
    ]
}


From the look of it we have one tab, this is obviously not right since all channels have at least one tab for Conversations and one called Files.

GraphTeam_tabs.png

The query does however list all tabs that we are able to edit, which makes sense.

The tab that was returned was a Wiki tab, and what is the first thing we do with the Wiki tab? We replace it with a OneNote tab! So let’s remove it by adding the tab ID to the query and changing from GET to DELETE.

DELETE https://graph.microsoft.com/beta/teams/74bacc8d-dd90-4b5a-aba2-72cf9c044eea/channels/19:3244b3fd6f8a42d390a79706b68678f1@thread.skype/tabs/0d042444-0c01-4fbd-afb8-2f936f7ba751


It doesn’t return anything, but we can clearly see that the Wiki tab has been removed.

GraphTeam_tabs_noWiki.png


To learn how to construct the object when creating a tab there are examples in the API reference documents. You can also get information querying for existing tabs, I have added a website tab, lets see what that looks like.

GET https://graph.microsoft.com/beta/teams/74bacc8d-dd90-4b5a-aba2-72cf9c044eea/channels/19:3244b3fd6f8a42d390a79706b68678f1@thread.skype/tabs

Response:
{
    "@odata.context": "https://graph.microsoft.com/beta/$metadata#teams('74bacc8d-dd90-4b5a-aba2-72cf9c044eea')/channels('19%3A3244b3fd6f8a42d390a79706b68678f1%40thread.skype')/tabs",
    "value": [
        {
            "id": "862ba9d9-9e68-48ad-a0b8-5ca4ac637c55",
            "name": "Teams.rocks",
            "teamsAppId": "com.microsoft.teamspace.tab.web",
            "sortOrderIndex": "10100",
            "webUrl": "https://teams.microsoft.com/l/channel/19%3a3244b3fd6f8a42d390a79706b68678f1%40thread.skype/tab%3a%3a577a969c-9d7b-4ef5-bb2e-35d8086a3be5?webUrl=https%3a%2f%2fTeams.rocks&label=Teams.rocks&groupId=74bacc8d-dd90-4b5a-aba2-72cf9c044eea&tenantId=6ac1a27f-51d8-47e6-8485-5ee4f0e58fee",
            "configuration": {
                "entityId": "",
                "contentUrl": "https://Teams.rocks",
                "removeUrl": "",
                "websiteUrl": "https://Teams.rocks"
            }
        }
    ]
}


Lets also have a look at the example from the API references.

POST https://graph.microsoft.com/beta/teams/{id}/channels/{id}/tabs

{
  "name": "My Contoso Tab",
  "teamsAppId": "06805b9e-77e3-4b93-ac81-525eb87513b8",
  "configuration": {
    "entityId": "2DCA2E6C7A10415CAF6B8AB6661B3154",
    "contentUrl": "https://www.contoso.com/Orders/2DCA2E6C7A10415CAF6B8AB6661B3154/tabView",
    "websiteUrl": "https://www.contoso.com/Orders/2DCA2E6C7A10415CAF6B8AB6661B3154",
    "removeUrl": "https://www.contoso.com/Orders/2DCA2E6C7A10415CAF6B8AB6661B3154/uninstallTab"
  }
}


We’re going to need to give the tab a name, reference the correct teamsAppId and provide a URL.

POST https://graph.microsoft.com/beta/teams/74bacc8d-dd90-4b5a-aba2-72cf9c044eea/channels/19:3244b3fd6f8a42d390a79706b68678f1@thread.skype/tabs

Request body:

{
  "name": "Teams.rocks",
  "teamsAppId": "com.microsoft.teamspace.tab.web",
  "configuration": {
    "entityId": "2DCA2E6C7A10415CAF6B8AB6661B3154",
    "contentUrl": "https://Teams.rocks",
    "websiteUrl": "https://Teams.rocks",
    "removeUrl": ""
  }
}


There you go, a new website tab called Teams.rocks pointing at https://Teams.rocks.

Teams.rocks-website-tab.png


What about apps?

To add a tab for an app we need to first add the app itself to the team. In this example I will continue along the education scenario, which actually fits very well since schools need to provision a large amount of teams every summer and often have a requirement to have the same set of tabs in every team.

In order to get the necessary information we repeat the procedure from earlier: add the app to a team and run a GET querying apps. When we’ve got the teamsAppId, all we need to do is run a POST with with the teamsAppId in the request body.

POST https://graph.microsoft.com/beta/teams/74bacc8d-dd90-4b5a-aba2-72cf9c044eea/apps

Request body:

{
  "id": "95bab789-a64a-4cbf-a83e-70b7a7b06193"
}


We can see the Skooler app was added to the team by the user logged on to Graph Explorer.

Added_Skooler.png


Next we need to add the corresponding tab in the appropriate channel.

POST https://graph.microsoft.com/beta/teams/74bacc8d-dd90-4b5a-aba2-72cf9c044eea/channels/19:3244b3fd6f8a42d390a79706b68678f1@thread.skype/tabs

Request body:
{
  "name": "Skooler",
  "teamsAppId": "95bab789-a64a-4cbf-a83e-70b7a7b06193",
  "configuration": {
    "entityId": "",
    "contentUrl": "https://example_app_url.azurewebsites.net/",
    "websiteUrl": "",
    "removeUrl": ""
  }
}

Response:

{
    "@odata.context": "https://graph.microsoft.com/beta/$metadata#teams('74bacc8d-dd90-4b5a-aba2-72cf9c044eea')/channels('19%3A3244b3fd6f8a42d390a79706b68678f1%40thread.skype')/tabs/$entity",
    "id": "c697cf16-41f2-478f-8198-3610bb530208",
    "name": "Skooler",
    "teamsAppId": "95bab789-a64a-4cbf-a83e-70b7a7b06193",
    "sortOrderIndex": "10100",
    "webUrl": "https://teams.microsoft.com/l/channel/19%3a3244b3fd6f8a42d390a79706b68678f1%40thread.skype/tab%3a%3a94876f30-ecce-4476-b1a4-0bbfc8aa2f51?label=Skooler&groupId=74bacc8d-dd90-4b5a-aba2-72cf9c044eea&tenantId=6ac1a27f-51d8-47e6-8485-5ee4f0e58fee",
    "configuration": {
        "entityId": "",
        "contentUrl": "https://example_app_url.azurewebsites.net/",
        "removeUrl": "",
        "websiteUrl": ""
    }
}


The Skooler app is now available as a tab within the General channel.

Skooler_app.png

Stay tuned for more in part two of this series, where you will learn how to combine what you learned above with a bit of PowerShell automation magic to add tabs as part of a team creation process.

Parent access in Microsoft Teams for Education

Parent access isn’t very prominent within Microsoft Teams for Education today, but there are ways to include them, one of which is  parent and guardian links in OneNote Class Notebook. In this post I will show you how to enable parent and guardian links in a class notebook part of a class team in Microsoft Teams.

Parents

Back in April 2017, the OneNote team announced read-only parent or guardian access in OneNote Class Notebook. Shortly after Microsoft Teams for Education was announced, and while class teams do include a class notebook, it’s stored in SharePoint, which require us to make some preparations before we can start sharing.

Disclaimer: While the content of this blog post was accurate at the time of writing September 22nd 2018, things change fast in the world of Microsoft Teams, so things might be different by the time you read this.

Let’s dive right in by first opening the class notebook within the class team, then choose Open in OneNote followed by Open in OneNote Online.

OpenInOneNoteOnline

The class notebook opens in the browser, we choose the Class Notebook tab followed by Manage Notebooks.

Manage_Notebooks

Choose Parent and guardian links

Notebook-links.png

Choose All students

ParentLinksAllStudents.png

Ouch! That doesn’t look good…

Error.png

The reason Parent Notebook Links can’t be generated is that the SharePoint site hosting the notebook doesn’t allow for anonymous sharing.

By default the teams underlying SharePoint site has the setting SharingCapability set to ExternalUserSharingOnly. To be able to create Parent Notebook Links it needs to be set to ExternalUserAndGuestSharing.

Luckily that’s easy, just get the site url…

GetSPSiteURL.png

and run the following PowerShell oneliner:

set-sposite -identity $Siteurl -sharingcapability ExternalUserAndGuestSharing

or follow my guide Anonymous guest sharing in Teams for a full tutorial.

If you would like to enable Parent Notebook Links for all class teams, and happen to use School Data Sync, you should instead see Anonymous guest sharing in Teams part two.

You can also modify the sharing settings from within the new SharePoint Admin Center:

SPAdmin.png

Choose Anyone and hit save.

Anyone.png


Once that is done, and the SharingCapability is set to ExternalUserAndGuestSharing, it looks much better:

ParentLinksOK.png

Just send the individual links to parents and they’re good to go!

This is one way to involve parent when using Microsoft Teams for Education. Let’s hope that we in a not so distant future will be able to also give parents insights into Assignments, or better yet, get a complete parent portal with messages and week plans.

If you don’t want to wait, have a look at how you can supplement Microsoft Teams for Education with learning management tools from 3rd parties like Skooler. Check out my two part series Teams + Skooler, better together – part 1 and Teams + Skooler, better together – part 2.


365edu Copenhagen

Next month (October 24th 2018) I’ve been invited to speak at a new conference focusing on Microsoft 365 and education!

v2 Twitter Speaker Template Denmark Magnus (2).png

365edu is a conference for teachers by teachers and education experts, and their ambition is to improve teaching and learning through the effective use of technology.

Sound awesome! I’ve been focusing a lot towards the education sector lately, both in terms of enterprise mobility, to ease the pain of managing student devices, apps and more, as well as on modern classroom experiences with Microsoft Teams integrated with 3rd party learning tools.

I’ll be in the Transformation Stream hosting two sessions:

#1 Move your education envrionment to the cloud with Microsoft 365

Microsoft Teams has quickly become the coolest kid in class, serving as a digital hub for teachers and students everywhere.

Together with the rest of Office 365, on Windows 10 Education devices managed by Intune, you get a complete cloud environment in an affordable bundle.

During this presentation you will see how you can support student devices from cradle to the grave with Autopilot and Intune, and get a demo of automatic creation of class teams, complete with teacher and students using School Data Sync. You will also learn how you can utilize student data, like grade and graduation year, to automate anything from deployment of applications to automatic redeployment of Windows 10 devices end of year.

#2 Teams and Transformation of the organization

How Horten municipality developed a platform for collaboration & learning with Microsoft Teams and 3rd party learning tools!

Todays classroom isn’t limited to the time teachers and students spend together in the classroom.  In todays tech-ready classroom, schools can get a digital classroom, a hub for collaboration and learning, through combining Microsoft Teams with integrated learning tools available from 3rd parties. 

I’ll will briefly touch on what Microsoft Teams is, then walk you through our journey migrating from documents in local file shares, a legacy learning management system, and show you how we use Microsoft Teams and integrated 3rd party learning tools for sharing, collaborating and learning, while at the same time including parents with weekly plans, absence, assessments, messages and much more!