Share a folder in Teams

In this short blog post I’ll demo the experience when sharing a folder from within Microsoft Teams.

teams-sharing.png

Let’s say you’re working on a project, and there are external parties like vendors or subcontractors involved, who needs to review or collaborate on some project documents.

You might for some reason not want to invite them as a guest to the team, so let’s instead just share the folder with the relevant documents.

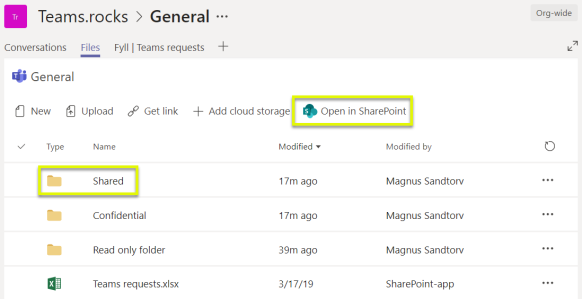
First open the Files tab, navigate to the location of the folder you’d like to share and click Open in SharePoint.

files.png

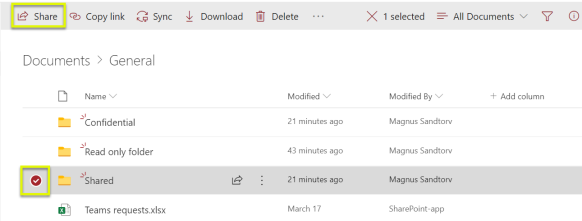
Mark the appropriate folder and click Share.share.png

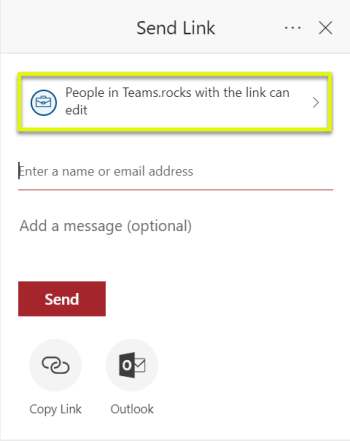
In the sharing dialogue, click to change who should be able to view or edit.

sharing dialogue.png

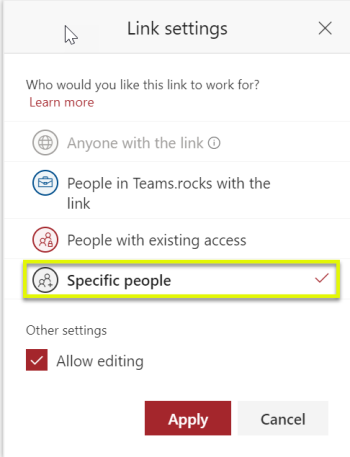
I’ll choose specific people, which ensures that the recipient will need to identify themselves by logging on.

sharing specific people.png

Notice that Anyone with the link is grayed out, this is as a result of default settings on the underlying SharePoint document library, but can easily be changed, which is something I covered here.

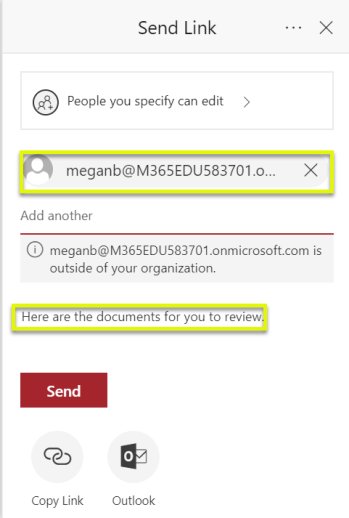
When you click Apply you’ll be able to enter the email of the recipient, and optionally add a short message.

Send link.png

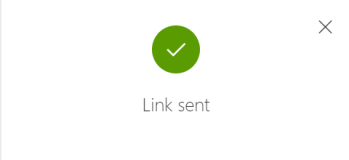
Click Send and you’ll get a notification confirming the link is sent.

link sent.png

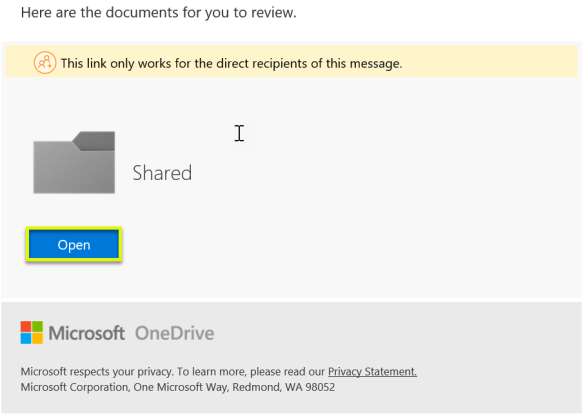
The recipient will receive an email notification and will start the process of gaining access by clicking Open.

open shared folder dialogue.png

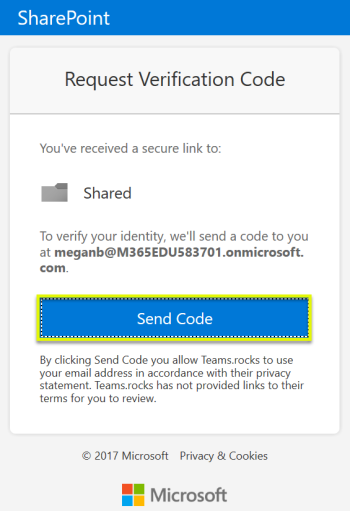
To verify the secure link, click Send Code.

send code.png

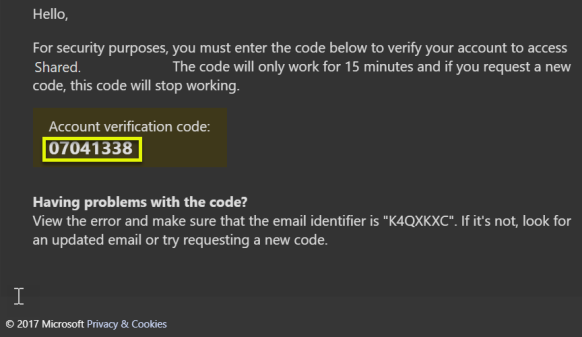
The recipient will receive an email with a code that is valid for 15 minutes.

code in email.png

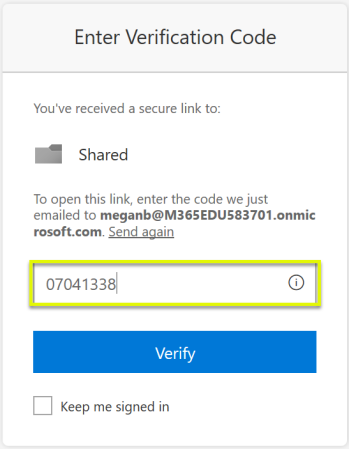
Copy the code, navigate back to the link sharing validation, paste it and click Verify.

verify code.png

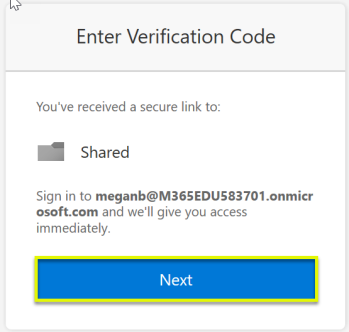
Click Next…

next.png

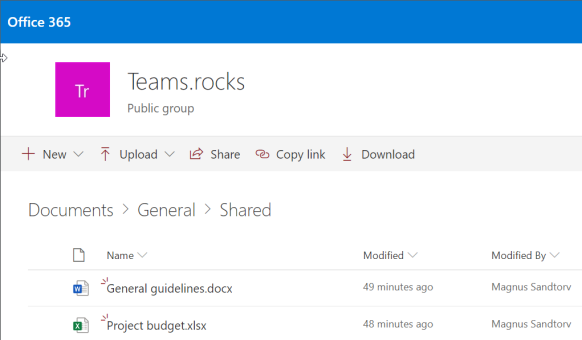
…and you will be taken to the shared folder in SharePoint.

files in teams.rocks tenant.png

Let’s finally verify that we can only see the appropriate folder by clicking General.

general.png

There you go, only one available folder…

only shared folder.png

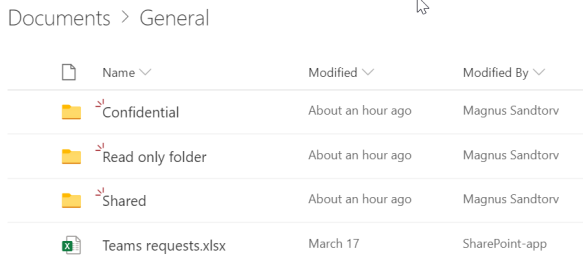
…as opposed to what the actual team members will see.

general channel view.png


Take control of your Microsoft Teams environment part 4

In part three we covered how to create a SharePoint list, with the goal of storing the input from our Teams request form. In this post we’ll conclude this part of the process, by using Microsoft Flow to integrate the request form with the SharePoint list.

Teams_forms_flow_sp

We’ve now got a request form, and a SharePoint list to store the responses. Let’s see if we can’t use Flow to tie the two together.

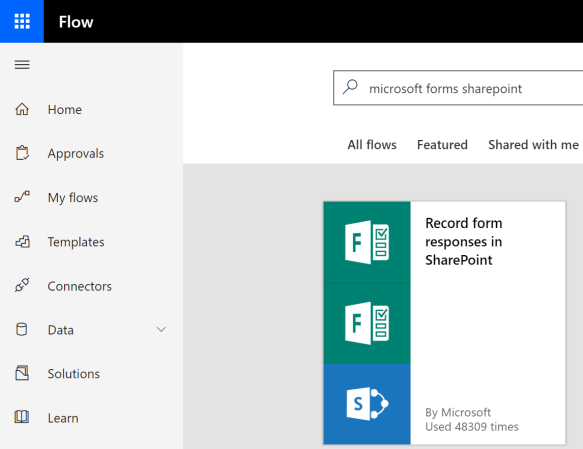
You’ll find Flow in the Office portal or by navigating to flow.microsoft.com. On the landing page you’ll see a search bar, and since we’re looking to connect Forms with SharePoint we’ll search for that.

reckord forms responses in SharePoint

The first hit is Record form responses in SharePoint, which is exactly what we’re after, so let’s choose that.

flow template

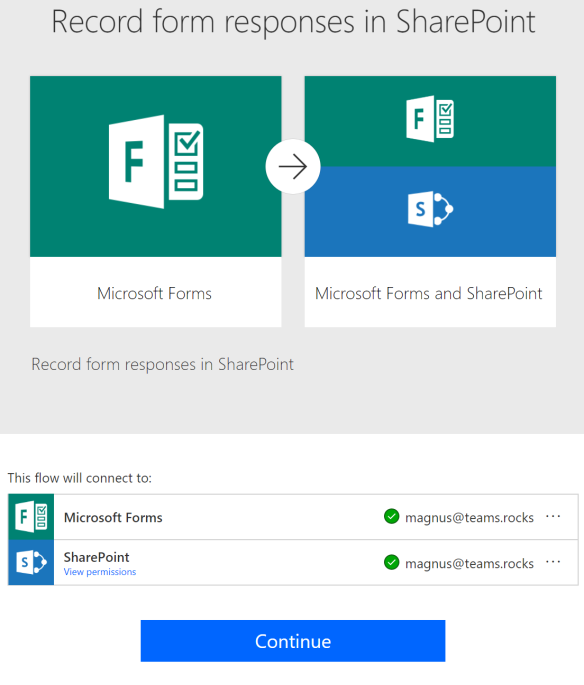
We’ll get some more information about this template and what it needs to connect to, as well as a way to specify what account should be used to connect to these services.

Pro tip! It’s generally a good idea to use a licensed service account in automated processes like this.

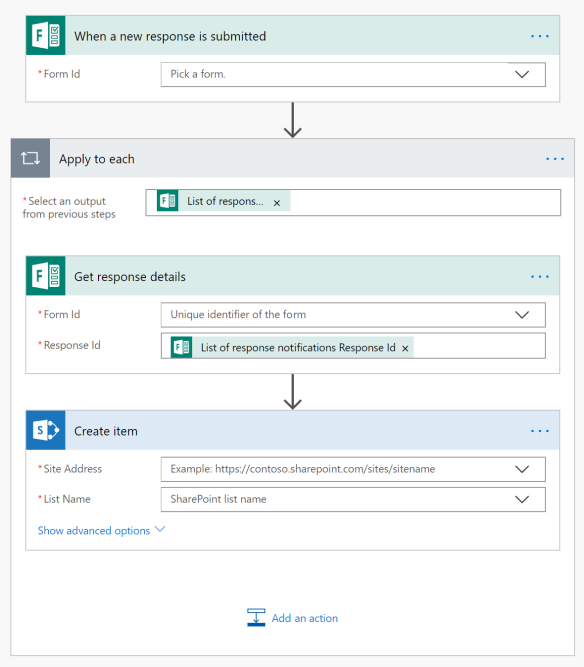
When we click Continue we’ll be presented with the standard template. There’s a few options we’re required to enter, like the source form, as well as the destination list.

flow-new.png

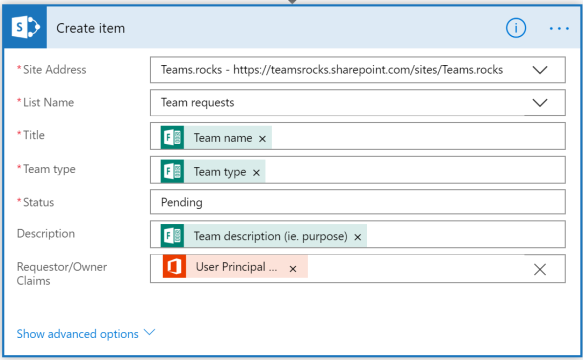
When the list is specified it’ll pull the columns, enabling us to dynamically match answers from the request form with the appropriate column in the list.

flow-SP-create_item.png

As mentioned we’ll use the Title column for Team name, and we’ll match both Team type and Team description with the appropriate columns.

Next we’ll add a descriptive text string to Status, informing users that the team request is pending.

The Requester/Owner column is actually populated with something not covered in the standard template. We’ll need to add an action called Get user profile (V2) to fetch user profile information from Office 365.

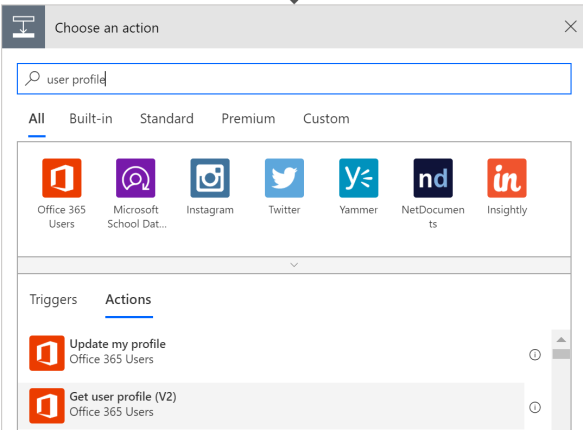
user profile.png

Let’s click the + icon above the SharePoint create item action, search for user profile, and add the Get user profile (V2) action.


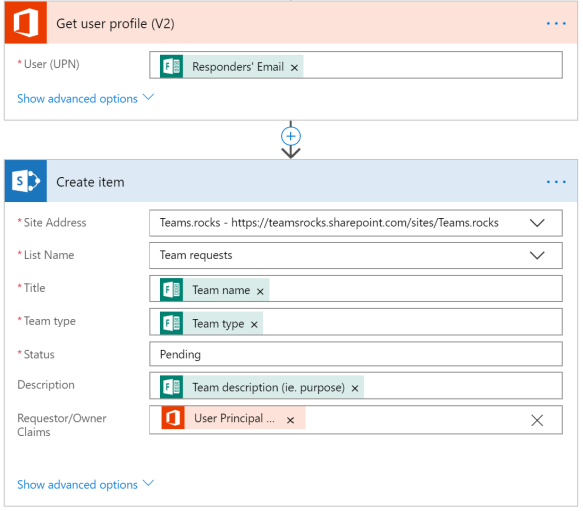
flow get user v2.png

We’ll add the email address of the requester in the Get user profile (V2) action using Responders’ Email from the form, and finally add the User Principal Name item from the former as shown above.

The above configuration requires that your User Principal Name (UPN) matches your e-mail.

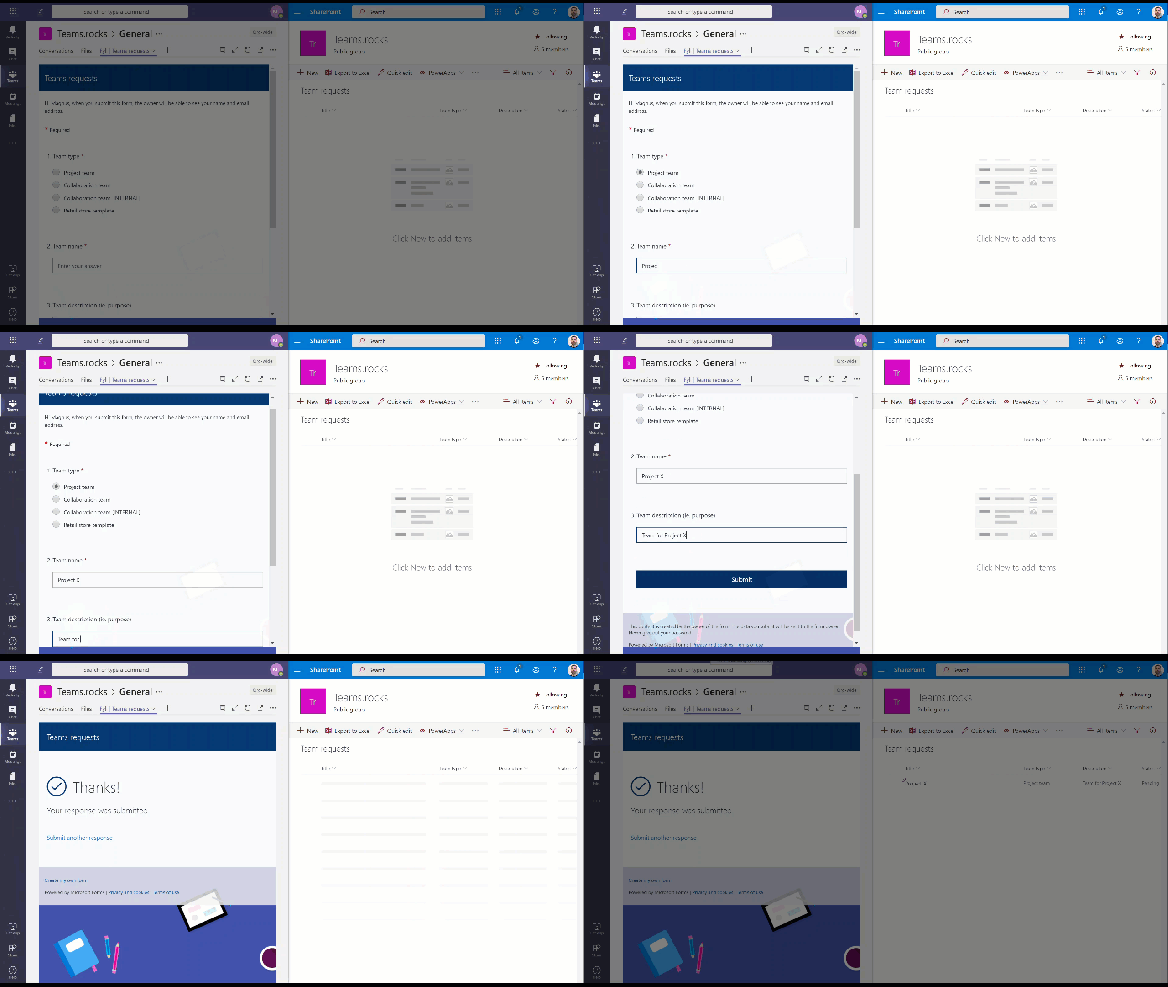
Finally let’s save the flow and request a team to confirm that the SharePoint list is updated.

new request added to SP list.gif

That’s it for today’s post, but make sure to follow my blog, to be among the first to learn how to automate team creation based on this request form, add manager approval and more.

If you have any questions or feedback, don’t hesitate to leave them in the comments below.

Take control of your Microsoft Teams environment part 3

In part two of this series we created a form where users could request a new team, and in this post I’ll show you how to create a SharePoint list to store information from the Teams requests.

Teams-SP-list.png

Taking input using a request form is great, but we need to reuse this information later on in this process, and it just so happens that SharePoint lists are great for this purpose!

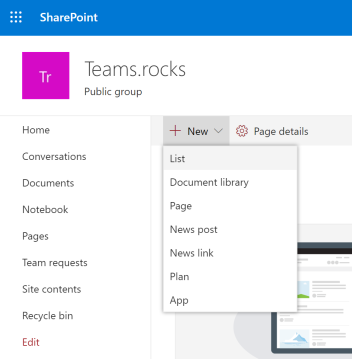
First navigate to SharePoint, I chose to use the site belonging to an org-wide team, but feel free to use your preferred site.

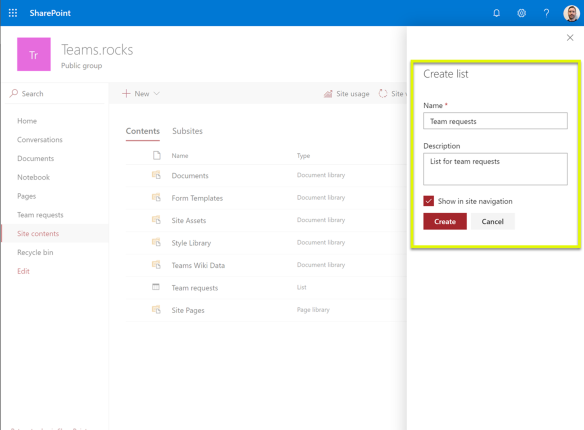
create list


Give your new list a new name and description, then hit Create.

Create list2

The new list will only have a Title column, so we’ll need to add a few more.

You might remember from the request form that we had three questions, one was team type, then team name, and finally team description. Let’s use Title for team name and add one for team type and team description.

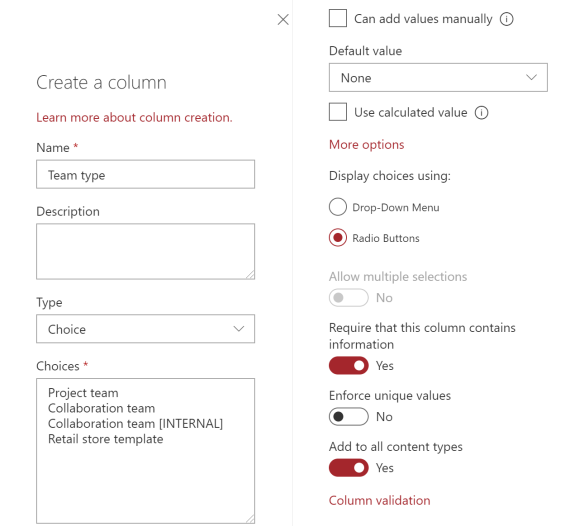
team type column

For team type (above) we need to use Choice as column type, and enter a few options in the Choices box.

I also chose radio buttons, but a drop-down menu would also work. Team type is essential later on, so we make sure it’s required that this column contains information.


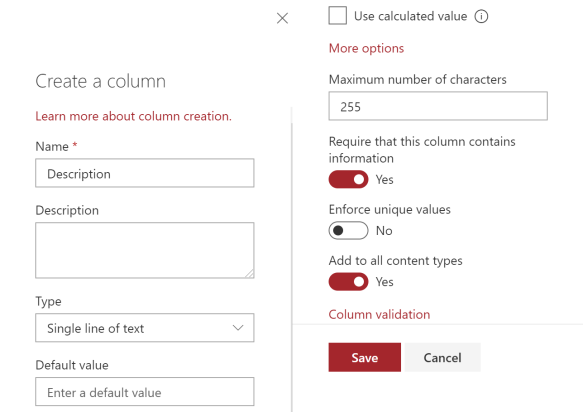
For description (below) we’ll keep the standard type, which is Single line of text.

description column.png

It’s entirely up to you whether or not team description should be mandatory, but keep in mind that it would give managers more insights into the purpose of the team upon approval.

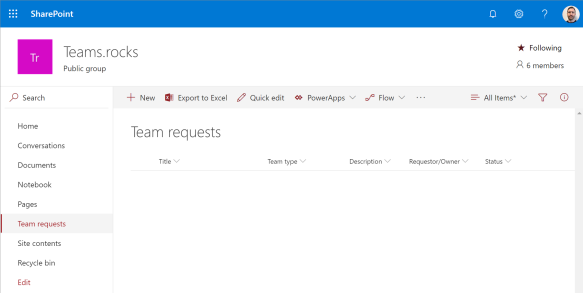
List columns.png

We’re also going to need some info about the requester later on, so we’ll add a column using the type Person. This allows us to store the entire person object, including the manager attribute.

Finally we’ll add a column called Status, where we can store information about the overall status of the approval process.

This concludes the process of creating a list in SharePoint, and in part four we will use Microsoft Flow to help us store any form responses in this list.

Take control of your Microsoft Teams environment part 2

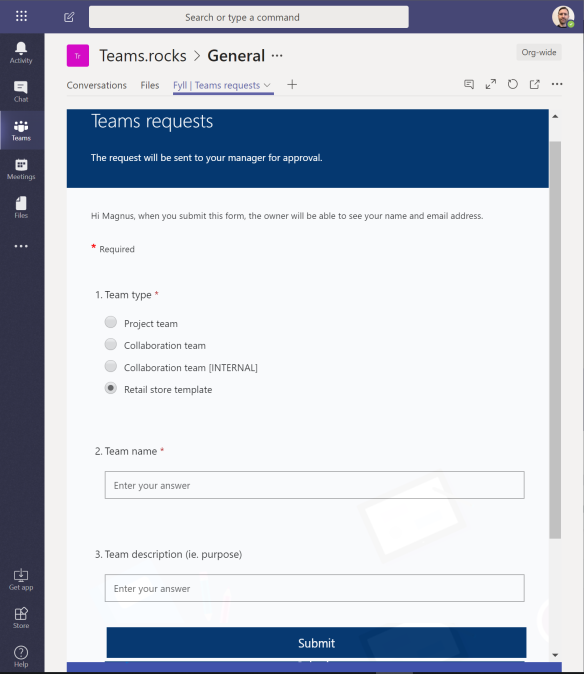
In part one of this series we covered how to control who can create teams, by limiting group creation. In this post we’ll create a form in Microsoft Forms, where end users can request a new team.Teams_and_Forms

While it’s sometimes important to control who’s able to create teams, in order to avoid teams sprawl, it’s equally important not to stand in the way of end users productivity.

So let’s jump right in and create a request form.

New_Form

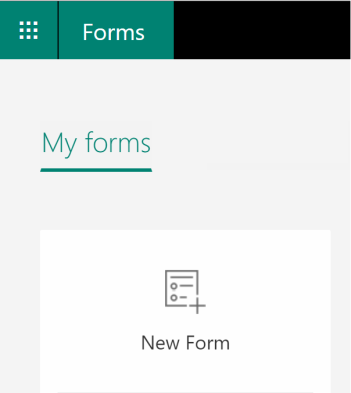
We do that by first choosing Forms in the Office waffle, or browse to forms.microsoft.com, and then hit the New Form button.

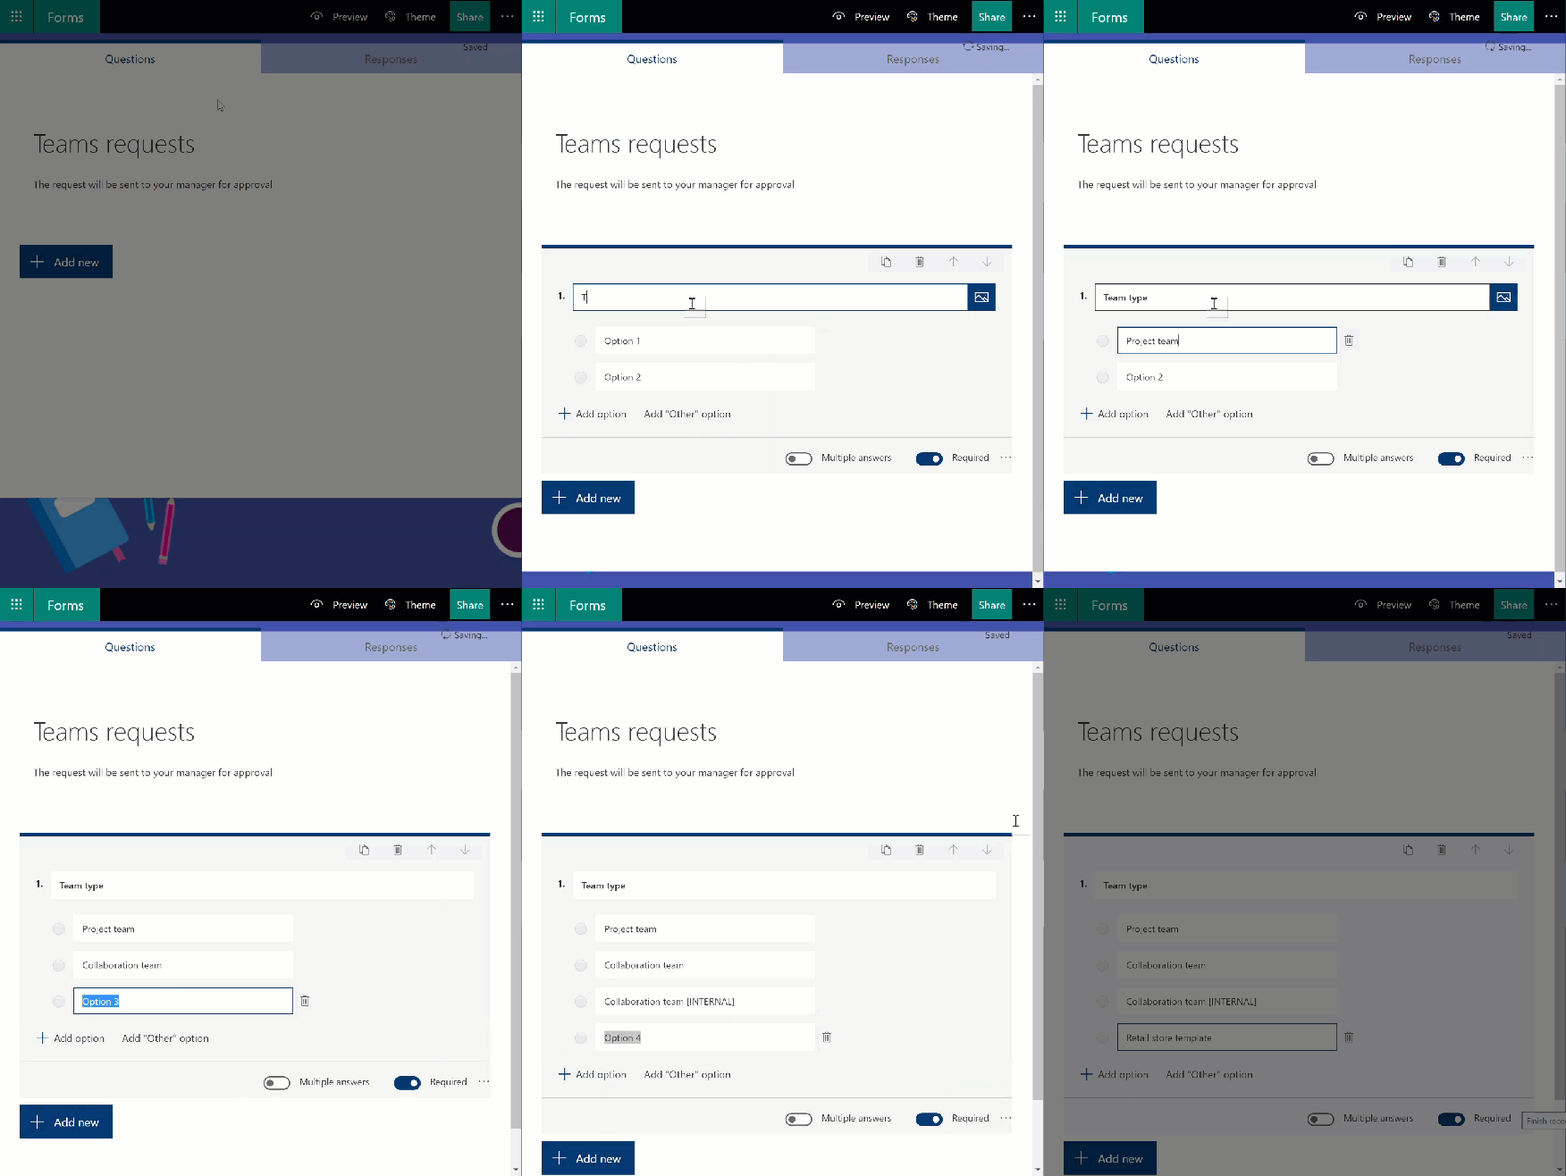
Let’s add a theme and give the request form a title.

Request form2

We’ll use the description to inform the user that the request will be sent to their manager for approval.

Next we’ll add a Choice called Team type, and mark it as required.

Request form3

Let’s also add a few options, which we’ll make use of at a later time.

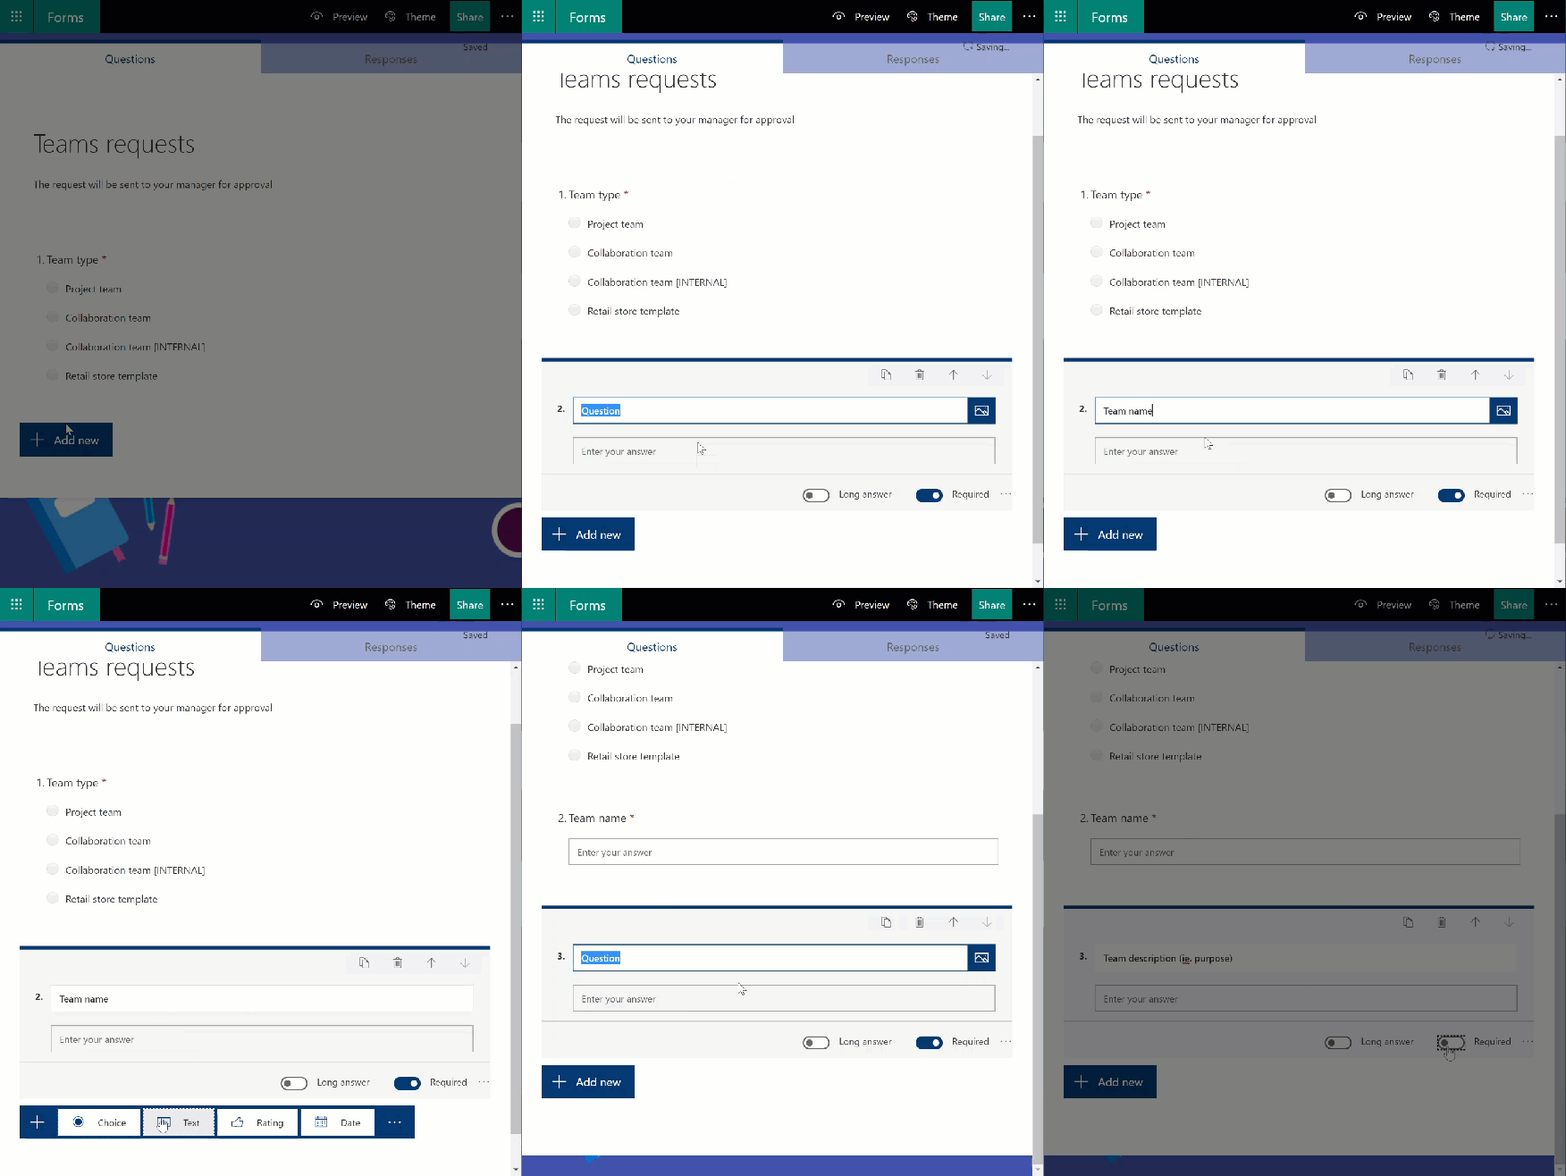
Last but not least, let’s add a required text field for Team name, and a text field for Description

Request form4

…before me make our new form easily available in an Org-wide team.

Teams_requests_tab

That’s it for now, but we’ve got lots more to cover. In part three we’ll create a SharePoint list to store this input, before we use Microsoft Flow to tie the two together.

Take control of your Microsoft Teams environment part 1

So, you introduced Microsoft Teams in your organization without a plan? Or perhaps you’re still planning your rollout, and want to learn how to take control? Well, you’ve come to the right place.

In a few blog posts my goal is to help you take control of your Teams environment, and first up is limiting who’s allowed to create teams.

teams_whit_lock

One of the first things we need to decide, before giving users access to Teams, is whether or not they should be allowed to create teams. Microsoft generally recommend that they should, which is why they are allowed using the default settings, and in many cases that makes perfect sense.

Let’s say you’re a small law firm, maybe ten lawyers and a couple of secretaries. You would most likely choose to allow anyone to provision new teams, not to get in the way of their productivity.

bad_students

But what if you’re a municipality, with a mix of employees in healthcare, education etc., as well as thousands of young students. You would most likely want to get in front of that, right, to make sure that new teams are appropriate, and to maintain in control?

Well, we lock down the provisioning of new teams by limiting group creation.

Keep in mind that disabling group creation also affect other services relying on Groups, like Planner, StaffHub etc.

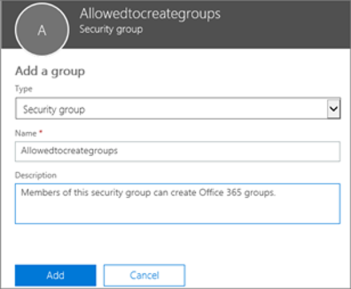
To limit group creation we first need to create a security group, and then add users who should still be allowed to create groups, and thereby teams.

All members of this security group must be licensed with Azure AD Premium or Azure AD Basic EDU. Microsoft currently does not enforce this, so it will work perfectly fine without assigning such licenses, but you need to acquire them to be properly licensed.

Allowedtocreategroups

The next step is to connect to Azure AD using the Azure AD Preview PowerShell module, and run the following script.

$GroupName = "Allowedtocreategroups"
$AllowGroupCreation = "False"

Connect-AzureAD # Need to be using the Azure AD Preview module

$settingsObjectID = (Get-AzureADDirectorySetting | Where-object -Property Displayname -Value "Group.Unified" -EQ).id

if(!$settingsObjectID)
{
    $template = Get-AzureADDirectorySettingTemplate | Where-object {$_.displayname -eq "group.unified"}
    $settingsCopy = $template.CreateDirectorySetting()
    New-AzureADDirectorySetting -DirectorySetting $settingsCopy
    $settingsObjectID = (Get-AzureADDirectorySetting | Where-object -Property Displayname -Value "Group.Unified" -EQ).id
}

$settingsCopy = Get-AzureADDirectorySetting -Id $settingsObjectID
$settingsCopy["EnableGroupCreation"] = $AllowGroupCreation

if($GroupName)
{
    $settingsCopy["GroupCreationAllowedGroupId"] = (Get-AzureADGroup -SearchString $GroupName).objectid
}

Set-AzureADDirectorySetting -Id $settingsObjectID -DirectorySetting $settingsCopy

(Get-AzureADDirectorySetting -Id $settingsObjectID).Values


We’ve now effectively disabled teams creation for all users that are not a member of the security group, causing the Create a team option to disappear from the Join or create a team page.

CreateTeam

Some admin roles will still be able to create groups and teams, like the Global Admin, Teams Service Admin etc.

For more information about limiting group creation please have a look at the official documentation, which was also my source for this blog post.

Also, stay tuned for more on the topic of controlling your Teams environment, next up is how to create a request form with manager approval!

New year news in School Data Sync

Read on to learn about all the new features coming to School Data Sync, like Parent Contact Sync, new EDU Security Groups, updated Section Usage Reports and more…

sds

What is School Data Sync?

For those of you who don’t know School Data Sync, it’s a free service in Office 365 for Education that read school roster data from the Student Information System (SIS) and use that data to provision and license users, create class teams with OneNote class notebooks and more. You can read more about SDS in my blog post on how to automate Teams for Education with School Data Sync.

img_0675

Microsoft recently announced a number of features coming to SDS, some of which will allow for new functionality in other services like Microsoft Teams, and some to enhance the admin experience. Let me go through the features one by one.

Parent Contact Sync

Parent sync in SDS is HUGE! Not by itself, obviously, but because it’s the first step in a long-awaited direction. The lack of ways to interact with parents in Teams for EDU has in my opinion been the Achilles heel of the education offering. While you could tweak permissions to allow sharing of parent and guardian links in OneNote class notebooks within Teams, it’s a cumbersome process which require admin permissions.

parents

For this reason alone, many education institutions have seen the need to invest in a learning management system. NowI’m not saying this will be the death of the LMS, innovative players like Skooler will keep adding value with their integrated solutions. But, for some schools, Microsoft Teams for Education will eventually be enough.


EDU Security Groups

EDU Security Groups used to be auto-provisioned in tenants using SDS while licensed with Intune for Education. These Azure AD security groups are however equally useful outside Intune, which is why this is great news!

These security groups are dynamic, meaning they will update as soon as something changes in your student information system. SDS will create groups for all teachers, all students, all teachers at school a, all students at school b etc.

In Intune these could be used in order to dynamically provision MDM policies, apps and more, similar to what I covered in my blog post on Microsoft 365 automation using SDS attributes, Intune & Graph.

Now we’re also able to use these groups for Group Based Licensing, Conditional Access and Scoped Search in Microsoft Teams. For those of you who don’t know Scoped Search, it’s a way to virtually separate users from eachother. Scoped Search use Exchange address book policies in order to hide users in one group from another, meaning you can separate students and teachers from different schools or even different grades, as well as separate students from other staff entirely.

Scoped Search (Address book policies) only provide a virtual separation of users. Users can still initiate communications with others by providing the complete user principal name (most often the email address).

Updated Section Usage Reports

Like the header says, section usage reports in SDS are getting an update. New reports will include synced class attributes, SharePoint usage, member count and more, to help you separate active and inactive class teams. Microsoft host a number of scripts to perform actions based on these reports, over at their O365-EDU-Tools GitHub repository.


And there’s more…

For admins the admin interface is beeing modernized to align with the experience found in the Office 365 Admin Center. There will be a People view in order to view students, teachers and parents, and  a Groups view for schools, classes and security groups synced by SDS.

The backend sync process itself just got improved performance, and in what’s more of a bugfix than a feature, error generation will be reduced to be more accurate. Previously an error on one sync element could produce 10-12 warnings, which was obviously confusing for admins.

That’s it for now, if you wish to stay updated on SDS make sure to also visit What’s new with School Data Sync.

Adding apps & tabs in Microsoft Teams using Graph – part 1

In part one of this two part tutorial I will show you how to add tabs within your channels in Microsoft Teams, using the Graph APIs. In part two I will also cover how you can automate the procedure using PowerShell, allowing for scenarios where you need to bulk add tabs to a large set of teams.

microsoft_graph

Microsoft Graph

First things first, what is Graph? Microsoft Graph is the gateway to data and intelligence in Microsoft 365, and allow applications to access digital work and digital life data across the intelligent Microsoft cloud (Source: Microsoft).

Sound great, but what does it really mean? In short it’s a set of REST APIs we can connect to in order to programatically interact with services within Microsoft 365, whether it’s to get meetings and calendar data from Exchange, mobile device status from Intune or feedback and grades from assignments in Microsoft Teams for Education.

Technically Microsoft has multiple Graph APIs, or endpoints, like the Intelligent Security Graph, the education API, Office Graph and more, but we can easily interact with them simultaneously, as well as use data from one in the other, so lets refer to Microsoft Graph as an entity going forward.

Like the title says, we’re going to focus on adding tabs within Teams today, a feature, or possibility if you will, announced at Microsoft Ignite 2018.


Who needs to add tabs programatically?

In many if not most cases, teams are setup and managed largely by team owners. But there are organizations that combine tools like Forms or PowerApps with Flow, in order to govern the team creation process using a request form. Others bulk create teams using the Microsoft Teams PowerShell module, and sectors like education have tools like School Data Sync to automate the teams lifecycle.

In those scenarios the team is created for the owner, often pre-populated with relevant members, and we might like to prepare it with a set of predefined channels, apps and tabs.


Getting the IDs

Microsoft love IDs, whether they’re called globalIDs, groupIDs or teamsAppIDs, and I’m sure also great ideas.

In order to add a tab, we first need to get the teams ID, the channel ID, and we need some info about the tab we’re adding. A great way to get started with Graph is using the Graph Explorer, so lets use that and see if we can find some of those IDs.

You must first login to the service, then modify the permissions (either according to the documentation or just add everything), and finally choose beta.

Graph_logon.png

This worked at the time of writing, but since these APIs are still in beta there might have been changes by the time you read this and they might have been moved into production (v1.0).


Lets first run a GET to see if the logged on user has any team memberships.

GET https://graph.microsoft.com/beta/me/joinedTeams

Response:
{
    "@odata.context": "https://graph.microsoft.com/beta/$metadata#groups",
    "value": [
        {
            "id": "74bacc8d-dd90-4b5a-aba2-72cf9c044eea",
            "displayName": "GraphTeam",
            "description": "GraphTeam",
            "isArchived": false
        }
    ]
}


We can see this particular user is a member of one team caled GraphTeam, and we also get the teams ID. Lets use that and see if there are any channels in that team.

GET https://graph.microsoft.com/beta/teams/74bacc8d-dd90-4b5a-aba2-72cf9c044eea/channels/

Response:
{
    "@odata.context": "https://graph.microsoft.com/beta/$metadata#teams('74bacc8d-dd90-4b5a-aba2-72cf9c044eea')/channels",
    "value": [
        {
            "id": "19:3244b3fd6f8a42d390a79706b68678f1@thread.skype",
            "displayName": "General",
            "description": null
        },
        {
            "id": "19:d6789651b4704d2db79c9f76a13009c2@thread.skype",
            "displayName": "Channel1",
            "description": null
        }
    ]
}


You can see the ID was added to the query, as well as /channels/ since that is what we’re after, and we get two channels in return; General and Channel1. Again we’re getting the IDs, let’s choose General and see if we can query for tabs.

GET https://graph.microsoft.com/beta/teams/74bacc8d-dd90-4b5a-aba2-72cf9c044eea/channels/19:3244b3fd6f8a42d390a79706b68678f1@thread.skype/tabs

Response:
{
    "@odata.context": "https://graph.microsoft.com/beta/$metadata#teams('74bacc8d-dd90-4b5a-aba2-72cf9c044eea')/channels('19%3A3244b3fd6f8a42d390a79706b68678f1%40thread.skype')/tabs",
    "value": [
        {
            "id": "0d042444-0c01-4fbd-afb8-2f936f7ba751",
            "name": "Wiki",
            "teamsAppId": "com.microsoft.teamspace.tab.wiki",
            "sortOrderIndex": "10000",
            "webUrl": "https://teams.microsoft.com/l/channel/19%3a3244b3fd6f8a42d390a79706b68678f1%40thread.skype/tab%3a%3a3accd260-ec69-43c8-8130-3908c1fbe02d?label=Wiki&groupId=74bacc8d-dd90-4b5a-aba2-72cf9c044eea&tenantId=6ac1a27f-51d8-47e6-8485-5ee4f0e58fee",
            "configuration": {
                "entityId": null,
                "contentUrl": null,
                "removeUrl": null,
                "websiteUrl": null,
                "wikiTabId": 1,
                "wikiDefaultTab": true,
                "hasContent": false
            }
        }
    ]
}


From the look of it we have one tab, this is obviously not right since all channels have at least one tab for Conversations and one called Files.

GraphTeam_tabs.png

The query does however list all tabs that we are able to edit, which makes sense.

The tab that was returned was a Wiki tab, and what is the first thing we do with the Wiki tab? We replace it with a OneNote tab! So let’s remove it by adding the tab ID to the query and changing from GET to DELETE.

DELETE https://graph.microsoft.com/beta/teams/74bacc8d-dd90-4b5a-aba2-72cf9c044eea/channels/19:3244b3fd6f8a42d390a79706b68678f1@thread.skype/tabs/0d042444-0c01-4fbd-afb8-2f936f7ba751


It doesn’t return anything, but we can clearly see that the Wiki tab has been removed.

GraphTeam_tabs_noWiki.png


To learn how to construct the object when creating a tab there are examples in the API reference documents. You can also get information querying for existing tabs, I have added a website tab, lets see what that looks like.

GET https://graph.microsoft.com/beta/teams/74bacc8d-dd90-4b5a-aba2-72cf9c044eea/channels/19:3244b3fd6f8a42d390a79706b68678f1@thread.skype/tabs

Response:
{
    "@odata.context": "https://graph.microsoft.com/beta/$metadata#teams('74bacc8d-dd90-4b5a-aba2-72cf9c044eea')/channels('19%3A3244b3fd6f8a42d390a79706b68678f1%40thread.skype')/tabs",
    "value": [
        {
            "id": "862ba9d9-9e68-48ad-a0b8-5ca4ac637c55",
            "name": "Teams.rocks",
            "teamsAppId": "com.microsoft.teamspace.tab.web",
            "sortOrderIndex": "10100",
            "webUrl": "https://teams.microsoft.com/l/channel/19%3a3244b3fd6f8a42d390a79706b68678f1%40thread.skype/tab%3a%3a577a969c-9d7b-4ef5-bb2e-35d8086a3be5?webUrl=https%3a%2f%2fTeams.rocks&label=Teams.rocks&groupId=74bacc8d-dd90-4b5a-aba2-72cf9c044eea&tenantId=6ac1a27f-51d8-47e6-8485-5ee4f0e58fee",
            "configuration": {
                "entityId": "",
                "contentUrl": "https://Teams.rocks",
                "removeUrl": "",
                "websiteUrl": "https://Teams.rocks"
            }
        }
    ]
}


Lets also have a look at the example from the API references.

POST https://graph.microsoft.com/beta/teams/{id}/channels/{id}/tabs

{
  "name": "My Contoso Tab",
  "teamsAppId": "06805b9e-77e3-4b93-ac81-525eb87513b8",
  "configuration": {
    "entityId": "2DCA2E6C7A10415CAF6B8AB6661B3154",
    "contentUrl": "https://www.contoso.com/Orders/2DCA2E6C7A10415CAF6B8AB6661B3154/tabView",
    "websiteUrl": "https://www.contoso.com/Orders/2DCA2E6C7A10415CAF6B8AB6661B3154",
    "removeUrl": "https://www.contoso.com/Orders/2DCA2E6C7A10415CAF6B8AB6661B3154/uninstallTab"
  }
}


We’re going to need to give the tab a name, reference the correct teamsAppId and provide a URL.

POST https://graph.microsoft.com/beta/teams/74bacc8d-dd90-4b5a-aba2-72cf9c044eea/channels/19:3244b3fd6f8a42d390a79706b68678f1@thread.skype/tabs

Request body:

{
  "name": "Teams.rocks",
  "teamsAppId": "com.microsoft.teamspace.tab.web",
  "configuration": {
    "entityId": "2DCA2E6C7A10415CAF6B8AB6661B3154",
    "contentUrl": "https://Teams.rocks",
    "websiteUrl": "https://Teams.rocks",
    "removeUrl": ""
  }
}


There you go, a new website tab called Teams.rocks pointing at https://Teams.rocks.

Teams.rocks-website-tab.png


What about apps?

To add a tab for an app we need to first add the app itself to the team. In this example I will continue along the education scenario, which actually fits very well since schools need to provision a large amount of teams every summer and often have a requirement to have the same set of tabs in every team.

In order to get the necessary information we repeat the procedure from earlier: add the app to a team and run a GET querying apps. When we’ve got the teamsAppId, all we need to do is run a POST with with the teamsAppId in the request body.

POST https://graph.microsoft.com/beta/teams/74bacc8d-dd90-4b5a-aba2-72cf9c044eea/apps

Request body:

{
  "id": "95bab789-a64a-4cbf-a83e-70b7a7b06193"
}


We can see the Skooler app was added to the team by the user logged on to Graph Explorer.

Added_Skooler.png


Next we need to add the corresponding tab in the appropriate channel.

POST https://graph.microsoft.com/beta/teams/74bacc8d-dd90-4b5a-aba2-72cf9c044eea/channels/19:3244b3fd6f8a42d390a79706b68678f1@thread.skype/tabs

Request body:
{
  "name": "Skooler",
  "teamsAppId": "95bab789-a64a-4cbf-a83e-70b7a7b06193",
  "configuration": {
    "entityId": "",
    "contentUrl": "https://example_app_url.azurewebsites.net/",
    "websiteUrl": "",
    "removeUrl": ""
  }
}

Response:

{
    "@odata.context": "https://graph.microsoft.com/beta/$metadata#teams('74bacc8d-dd90-4b5a-aba2-72cf9c044eea')/channels('19%3A3244b3fd6f8a42d390a79706b68678f1%40thread.skype')/tabs/$entity",
    "id": "c697cf16-41f2-478f-8198-3610bb530208",
    "name": "Skooler",
    "teamsAppId": "95bab789-a64a-4cbf-a83e-70b7a7b06193",
    "sortOrderIndex": "10100",
    "webUrl": "https://teams.microsoft.com/l/channel/19%3a3244b3fd6f8a42d390a79706b68678f1%40thread.skype/tab%3a%3a94876f30-ecce-4476-b1a4-0bbfc8aa2f51?label=Skooler&groupId=74bacc8d-dd90-4b5a-aba2-72cf9c044eea&tenantId=6ac1a27f-51d8-47e6-8485-5ee4f0e58fee",
    "configuration": {
        "entityId": "",
        "contentUrl": "https://example_app_url.azurewebsites.net/",
        "removeUrl": "",
        "websiteUrl": ""
    }
}


The Skooler app is now available as a tab within the General channel.

Skooler_app.png

Stay tuned for more in part two of this series, where you will learn how to combine what you learned above with a bit of PowerShell automation magic to add tabs as part of a team creation process.

Parent access in Microsoft Teams for Education

Parent access isn’t very prominent within Microsoft Teams for Education today, but there are ways to include them, one of which is  parent and guardian links in OneNote Class Notebook. In this post I will show you how to enable parent and guardian links in a class notebook part of a class team in Microsoft Teams.

Parents

Back in April 2017, the OneNote team announced read-only parent or guardian access in OneNote Class Notebook. Shortly after Microsoft Teams for Education was announced, and while class teams do include a class notebook, it’s stored in SharePoint, which require us to make some preparations before we can start sharing.

Disclaimer: While the content of this blog post was accurate at the time of writing September 22nd 2018, things change fast in the world of Microsoft Teams, so things might be different by the time you read this.

Let’s dive right in by first opening the class notebook within the class team, then choose Open in OneNote followed by Open in OneNote Online.

OpenInOneNoteOnline

The class notebook opens in the browser, we choose the Class Notebook tab followed by Manage Notebooks.

Manage_Notebooks

Choose Parent and guardian links

Notebook-links.png

Choose All students

ParentLinksAllStudents.png

Ouch! That doesn’t look good…

Error.png

The reason Parent Notebook Links can’t be generated is that the SharePoint site hosting the notebook doesn’t allow for anonymous sharing.

By default the teams underlying SharePoint site has the setting SharingCapability set to ExternalUserSharingOnly. To be able to create Parent Notebook Links it needs to be set to ExternalUserAndGuestSharing.

Luckily that’s easy, just get the site url…

GetSPSiteURL.png

and run the following PowerShell oneliner:

set-sposite -identity $Siteurl -sharingcapability ExternalUserAndGuestSharing

or follow my guide Anonymous guest sharing in Teams for a full tutorial.

If you would like to enable Parent Notebook Links for all class teams, and happen to use School Data Sync, you should instead see Anonymous guest sharing in Teams part two.

You can also modify the sharing settings from within the new SharePoint Admin Center:

SPAdmin.png

Choose Anyone and hit save.

Anyone.png


Once that is done, and the SharingCapability is set to ExternalUserAndGuestSharing, it looks much better:

ParentLinksOK.png

Just send the individual links to parents and they’re good to go!

This is one way to involve parent when using Microsoft Teams for Education. Let’s hope that we in a not so distant future will be able to also give parents insights into Assignments, or better yet, get a complete parent portal with messages and week plans.

If you don’t want to wait, have a look at how you can supplement Microsoft Teams for Education with learning management tools from 3rd parties like Skooler. Check out my two part series Teams + Skooler, better together – part 1 and Teams + Skooler, better together – part 2.


Microsoft 365 automation using SDS attributes, Intune & Graph

June 19th I had the pleasure of talking about how to move your education environment to the cloud with Microsoft 365, at Experts Live Netherlands. In this post I will discuss some of the examples from that talk.

Disclaimer: While these SDS attribute examples worked at the time of writing, they are not supported by Microsoft moving forward. For anything other than testing, please consider building on top of the Education APIs in Microsoft Graph.


EL_social_tempate_speakers_Magnus.png

Experts Live Netherlands is a conference held in Ede, Netherlands, with more than a thousand attendees. For me this was a first, I had never before spoken at such a large conference, neither outside Norway.

OnStage2.png

I obviously spoke about Teams, and how to automate using School Data Sync which I have blogged about before, but also on modern management with Autopilot and Intune, and how to utilize extension attributes from SDS to automate anything from application delivery to redeployment of Windows 10 devices.


School Data Sync

To recap, School Data Sync is a free service in Office 365 Education. It takes data about Students, teachers, class rosters and more, from the Student Information System, and use that data to create and license users in Azure Active Directory and Microsoft 365, create classes in Microsoft Teams, complete with teachers and students, and more.

2018-03-29 16_29_15-Welcome to the 2018 Learn Teams Conference.pptx - PowerPoint

School Data Sync also lets you get grades and graduation year from the Student Information System, which you could then use to assign apps dynamically, automate archiving of classes End Of Year and to trigger Autopilot Reset.

2018-06-23 14_16_01-Task Switching.png

I won’t go through the details of setting up SDS, since I already covered that in a previous post, but you can see above what properties are available. In the upcoming examples we will need Grade and Graduation Year.

Autopilot

Autopilot is a set of technologies designed to get Windows 10 devices quickly into a secure and managed state, as well as reset, repurpose or recover them when needed.

Those who manage Apple iOS devices will notice there are many similarities to the Apple Device Enrollment Program (DEP).

Microsoft-365-powered-device-Windows-Autopilot-Deployment.png

To get devices into Autopilot we need the hardware vendor or distributor to provide or upload the hardware IDs, and we need to assign a deployment profile.

Within the Device Management portal in Azure we go to Device Enrollment followed by Windows Enrollment and Deployment Profiles.

We click Create profile, give it a name and choose a deployment mode, User-Driven in this case, specify that it should be joined to Azure AD, hide the EULA and Privacy Settings to ease the setup process for the user, and set the User account type to Standard.

2018-06-23 14_40_43-Task Switching.png


We assign the profile to a group of users and we’re good to go.

Vendor or distributor ship the device directly to the school, the student unboxes the device and gets a customized Out Of Box Experience.

They need to choose a region and pick a keyboard layout, as well as choose the appropriate Wi-Fi network.

Windows will then fetch the latest updates for the OOBE experience, and query the Autopilot service to get the configuration we just created.

2018-06-04 17_20_00-Remote Desktop Manager [hyperv].png

Company branding has been applied even before the student logs on, ensuring a sense of familiarity.

After logon the device starts configuring, and since we’re licensed and setup with Microsoft 365 A3 it will auto-enroll into Intune and get any configuration profiles, compliance policies and apps pushed down.

Auto-enrollment requires Azure AD Premium as well as a Mobile Device Management service like Intune (part of EMS and Microsoft 365 SKUs like A3, A5 etc.)


Dynamic application delivery

By now the device is enrolled and managed with Intune, and apps are installing, but students in the first grade most likely need different apps than students in the 7th grade?

So let’s find the extension attributes available from SDS, and create dynamic groups for app association. Relevant attributes can be found with the format: extension_appId_attribute name, and the appId for SDS is fe2174665583431c953114ff7268b7b3.

We need to connect to Azure AD using the preview module, then search for a user and have a look at the extension attributes.

Get-AzureADUser -SearchString student@teams.rocks | select -ExpandProperty ExtensionProperty

2018-06-25 17_31_35-Task Switching.png

You can see we have attributes like GraduationYear and Grade, as well as ObjectType to distinguish between students and teachers.

Let’s add all our users to a variable and then create a custom object to show only what is relevant.

# add users to variable
$users = Get-AzureADUser

# create a custom object and list users, grade and role
foreach ($user in $users) {
$user | select –Property @{n = 'Name'; e = {$_.DisplayName}},
@{n = 'Role'; e = {$_.ExtensionProperty.'extension_fe2174665583431c953114ff7268b7b3_Education_ObjectType'}},
@{n = 'Grade'; e = {$_.ExtensionProperty.'extension_fe2174665583431c953114ff7268b7b3_Education_Grade'}},
@{n = 'GraduationYear'; e = {$_.ExtensionProperty.'extension_fe2174665583431c953114ff7268b7b3_Education_GraduationYear'}}
}


2018-06-23 18_01_02-Task Switching.png We’ve got students from grade 7 and 8 as well as a teacher, synced using SDS. We also have the Graduation Year, which we will use later. First let’s create dynamic groups for app association.

# create dynamic group for Grade 7
New-AzureADMSGroup -DisplayName "Grade 7" -MailEnabled $false -MailNickname "Grade7" -SecurityEnabled $True -GroupTypes DynamicMembership -MembershipRule "(user.extension_fe2174665583431c953114ff7268b7b3_Education_Grade -eq ""7"")" -MembershipRuleProcessingState On

# create dynamic group for Grade 8
New-AzureADMSGroup -DisplayName "Grade 8" -MailEnabled $false -MailNickname "Grade8" -SecurityEnabled $True -GroupTypes DynamicMembership -MembershipRule "(user.extension_fe2174665583431c953114ff7268b7b3_Education_Grade -eq ""8"")" -MembershipRuleProcessingState On

# create dynamic group for Graduation Year
New-AzureADMSGroup -DisplayName "Graduates 2021" -Description "Students that graduate in year 2021" -MailEnabled $false -MailNickname "Graduates2021" -SecurityEnabled $True -GroupTypes DynamicMembership -MembershipRule "(user.extension_fe2174665583431c953114ff7268b7b3_Education_GraduationYear -eq ""2021"")" -MembershipRuleProcessingState On

We created two dynamic groups for grade 7 and 8, as well as one for Graduation Year 2021.

# list groups
Get-AzureADMSGroup | select DisplayName, GroupTypes

Let’s also list the groups.

2018-06-23 18_14_45-Task Switching.png

Use dynamic groups like Grade 7 and 8 to assign applications. Whenever there is a new school year in august, students from grade 7 will be moved into the group for grade 8 and Intune will remove apps assigned to grade 7 and add any apps, or profiles for that matter, assigned to grade 8.


Autopilot Reset

Windows Autopilot Reset removes personal files, apps, and settings, resetting Windows 10 while still maintaining Azure AD Join and MDM enrollment.

Microsoft first announced this with 1709 as automatic redeployment, and said remote triggering would be available in the spring. Then remote triggering was pulled from 1803, but reappeared in insider build 17672 and was announced June 7th as Autopilot Reset.

Devices will retain the region, language, and keyboard settings, and connect to Wi-Fi using the network credentials provisioned prior to the reset.

This means that we can use the group we created earlier, based on graduation year, to automatically reprovision a set of devices!

When new students arrive after the summer they can log on to a fresh device in a managed and secure state, and all Intune needs to do is push any apps or profiles unique to the user or grade.

This example utilizes the Microsoft Graph to instruct the Intune service to reset one or more devices in a certain way. I will not cover the authentication part of working with Graph, but you can find the functions used in this example in Microsofts Github repository for powershell Intune samples.

First we need to construct a payload with the wipe instructions.

# construct JSON object (body) for wipe instructions
$payload = @{
keepEnrollmentData = $true
keepUserData = $false
}
$body = $payload | ConvertTo-Json

The object will look like this:

{
"keepEnrollmentData": true,
"keepUserData": false
}


We will then get the users from the dynamic group we created earlier, and the Device IDs of any devices they have enrolled in Intune. We use the Device ID to construct a URI, and trigger the wipe action using the Invoke-RestMethod cmdlet pointing to that URI together with the authToken as well as the JSON payload from the last step.

$users = Get-AzureADGroup -SearchString "Graduates 2021" | Get-AzureADGroupMember
foreach ($user in $users) {

# get user id (Intune device ID is not the same as Azure AD device ID)
$id = (Get-AADUser -userPrincipalName $user.UserPrincipalName).id
# get id from device registered to user
$DeviceID = (Get-AADUserDevices -UserID $id).id
if ($DeviceID) {
# construct uri
$Resource = "deviceManagement/managedDevices/$DeviceID/wipe"
$uri = "https://graph.microsoft.com/beta/$($resource)"
# reset device
Write-Host "Performing reset on device $DeviceID" -ForegroundColor Yellow
Invoke-RestMethod -Uri $uri -Headers $authToken -Method Post -Body $body

}
else {

Write-Host "User has no registered device" -ForegroundColor Cyan
}
}


The URI should look like this: https://graph.microsoft.com/beta/deviceManagement/managedDevices/7345bdbf-1f17-4b59-85e7-ac2e545d776c/wipe

And this is the result in our demo environment:

2018-06-24 13_38_20-Task Switching.png

We had two students fitting the description, you can see the first one didn’t have a registered device, but the second did.

We can see from the Intune console the action automaticRedeployment is now pending (status will change to completed when the device has registered back into the service).

2018-06-24 13_39_22-Task Switching.png


If a user is logged on they will first receive a toast message, informing them a restart is scheduled in 45 minutes for automatic redeployment.

2018-06-24 13_41_43-Task Switching.png

35 minutes later they will get a popup message counting down, warning that Windows will shut down in 10 minutes.

2018-06-25 08_28_27-Remote Desktop Manager [hyperv].png

When the device is reset and ready for a new student they will see the message above on the login screen.


Needless to say, you can customize the above script to better suit you environment, maybe you need to reset all devices in a particular school or you have some other criteria.

Microsoft Graph EDU

To sum’ up, when using School Data Sync, a set of extension attributes can be made available. Combine that with the power of the Microsoft Graph, and you can automate anything from application delivery to redeployment of Windows 10 devices, freeing up valuable time for IT and educators.

Save directly to Teams from Office desktop apps

In this short tutorial I will show you how to use the save as dialogue to save your files directly into the files area of your favourite teams.

 

While you have always been able to drag and drop files into Teams, or upload them by navigating to the files tab in a channel and choosing Upload…

Files-Upload

…many are still used to work inside their Office desktop apps.


They are often also acustomed to using the save as dialogue to browse folders when saving their documents, or navigating to OneDrive or SharePoint sites this way. How cool would it be to have access to your favourite teams right from within Office?


Well as of now you can, if you are on the Office 365 ProPlus Monthly Channel and your build is 8730 or later.


Let’s first check the Office build by opening Word, going to File in the upleft corner and then Account in the left menu. You should see the product information and the installed build on the right.

Office-Product-info

This is supposedly a staged rollout, so it might be another week or so until all clients/tenants are affected.


To save a document to Teams, open or create a document from one of the Office desktop apps (Word, Excel, PowerPoint), hit File followed by Save As and choose Sites – Your Company in the menu. In the right column you should see a list of your teams.

SaveAsToTeams

If you find that the sorting of teams in the list is confusing, there is a thread on TechCommunity discussing this and a Microsoft employee explaining that “The sorting in the Frequent list is based on activity, with greater weight being placed on a Group that you have saved or opened a file from”. It does however at this time seem to consider all interactions, which can cause confusion as to the sorting of the list.


Make sure to save to the appropriate channel, by first browsing Documents and then opening the corresponding folder. Please also note that if you rename a channel, the folder in the underlying SharePoint site will not update with the new name (and doing so manually will break stuff). Also saving outside of the channel folders can make the documents unavailable for the Teams client.