About Magnus Sandtorv

Former Office Apps & Services MVP, Microsoft Teams Evangelist, Enterprise Mobility Professional, PowerShell automation enthusiast with my head in the ☁️ Blog at Teams.rocks

Microsoft 365 automation using SDS attributes, Intune & Graph

June 19th I had the pleasure of talking about how to move your education environment to the cloud with Microsoft 365, at Experts Live Netherlands. In this post I will discuss some of the examples from that talk.

Disclaimer: While these SDS attribute examples worked at the time of writing, they are not supported by Microsoft moving forward. For anything other than testing, please consider building on top of the Education APIs in Microsoft Graph.


EL_social_tempate_speakers_Magnus.png

Experts Live Netherlands is a conference held in Ede, Netherlands, with more than a thousand attendees. For me this was a first, I had never before spoken at such a large conference, neither outside Norway.

OnStage2.png

I obviously spoke about Teams, and how to automate using School Data Sync which I have blogged about before, but also on modern management with Autopilot and Intune, and how to utilize extension attributes from SDS to automate anything from application delivery to redeployment of Windows 10 devices.


School Data Sync

To recap, School Data Sync is a free service in Office 365 Education. It takes data about Students, teachers, class rosters and more, from the Student Information System, and use that data to create and license users in Azure Active Directory and Microsoft 365, create classes in Microsoft Teams, complete with teachers and students, and more.

2018-03-29 16_29_15-Welcome to the 2018 Learn Teams Conference.pptx - PowerPoint

School Data Sync also lets you get grades and graduation year from the Student Information System, which you could then use to assign apps dynamically, automate archiving of classes End Of Year and to trigger Autopilot Reset.

2018-06-23 14_16_01-Task Switching.png

I won’t go through the details of setting up SDS, since I already covered that in a previous post, but you can see above what properties are available. In the upcoming examples we will need Grade and Graduation Year.

Autopilot

Autopilot is a set of technologies designed to get Windows 10 devices quickly into a secure and managed state, as well as reset, repurpose or recover them when needed.

Those who manage Apple iOS devices will notice there are many similarities to the Apple Device Enrollment Program (DEP).

Microsoft-365-powered-device-Windows-Autopilot-Deployment.png

To get devices into Autopilot we need the hardware vendor or distributor to provide or upload the hardware IDs, and we need to assign a deployment profile.

Within the Device Management portal in Azure we go to Device Enrollment followed by Windows Enrollment and Deployment Profiles.

We click Create profile, give it a name and choose a deployment mode, User-Driven in this case, specify that it should be joined to Azure AD, hide the EULA and Privacy Settings to ease the setup process for the user, and set the User account type to Standard.

2018-06-23 14_40_43-Task Switching.png


We assign the profile to a group of users and we’re good to go.

Vendor or distributor ship the device directly to the school, the student unboxes the device and gets a customized Out Of Box Experience.

They need to choose a region and pick a keyboard layout, as well as choose the appropriate Wi-Fi network.

Windows will then fetch the latest updates for the OOBE experience, and query the Autopilot service to get the configuration we just created.

2018-06-04 17_20_00-Remote Desktop Manager [hyperv].png

Company branding has been applied even before the student logs on, ensuring a sense of familiarity.

After logon the device starts configuring, and since we’re licensed and setup with Microsoft 365 A3 it will auto-enroll into Intune and get any configuration profiles, compliance policies and apps pushed down.

Auto-enrollment requires Azure AD Premium as well as a Mobile Device Management service like Intune (part of EMS and Microsoft 365 SKUs like A3, A5 etc.)


Dynamic application delivery

By now the device is enrolled and managed with Intune, and apps are installing, but students in the first grade most likely need different apps than students in the 7th grade?

So let’s find the extension attributes available from SDS, and create dynamic groups for app association. Relevant attributes can be found with the format: extension_appId_attribute name, and the appId for SDS is fe2174665583431c953114ff7268b7b3.

We need to connect to Azure AD using the preview module, then search for a user and have a look at the extension attributes.

Get-AzureADUser -SearchString student@teams.rocks | select -ExpandProperty ExtensionProperty

2018-06-25 17_31_35-Task Switching.png

You can see we have attributes like GraduationYear and Grade, as well as ObjectType to distinguish between students and teachers.

Let’s add all our users to a variable and then create a custom object to show only what is relevant.

# add users to variable
$users = Get-AzureADUser

# create a custom object and list users, grade and role
foreach ($user in $users) {
$user | select –Property @{n = 'Name'; e = {$_.DisplayName}},
@{n = 'Role'; e = {$_.ExtensionProperty.'extension_fe2174665583431c953114ff7268b7b3_Education_ObjectType'}},
@{n = 'Grade'; e = {$_.ExtensionProperty.'extension_fe2174665583431c953114ff7268b7b3_Education_Grade'}},
@{n = 'GraduationYear'; e = {$_.ExtensionProperty.'extension_fe2174665583431c953114ff7268b7b3_Education_GraduationYear'}}
}


2018-06-23 18_01_02-Task Switching.png We’ve got students from grade 7 and 8 as well as a teacher, synced using SDS. We also have the Graduation Year, which we will use later. First let’s create dynamic groups for app association.

# create dynamic group for Grade 7
New-AzureADMSGroup -DisplayName "Grade 7" -MailEnabled $false -MailNickname "Grade7" -SecurityEnabled $True -GroupTypes DynamicMembership -MembershipRule "(user.extension_fe2174665583431c953114ff7268b7b3_Education_Grade -eq ""7"")" -MembershipRuleProcessingState On

# create dynamic group for Grade 8
New-AzureADMSGroup -DisplayName "Grade 8" -MailEnabled $false -MailNickname "Grade8" -SecurityEnabled $True -GroupTypes DynamicMembership -MembershipRule "(user.extension_fe2174665583431c953114ff7268b7b3_Education_Grade -eq ""8"")" -MembershipRuleProcessingState On

# create dynamic group for Graduation Year
New-AzureADMSGroup -DisplayName "Graduates 2021" -Description "Students that graduate in year 2021" -MailEnabled $false -MailNickname "Graduates2021" -SecurityEnabled $True -GroupTypes DynamicMembership -MembershipRule "(user.extension_fe2174665583431c953114ff7268b7b3_Education_GraduationYear -eq ""2021"")" -MembershipRuleProcessingState On

We created two dynamic groups for grade 7 and 8, as well as one for Graduation Year 2021.

# list groups
Get-AzureADMSGroup | select DisplayName, GroupTypes

Let’s also list the groups.

2018-06-23 18_14_45-Task Switching.png

Use dynamic groups like Grade 7 and 8 to assign applications. Whenever there is a new school year in august, students from grade 7 will be moved into the group for grade 8 and Intune will remove apps assigned to grade 7 and add any apps, or profiles for that matter, assigned to grade 8.


Autopilot Reset

Windows Autopilot Reset removes personal files, apps, and settings, resetting Windows 10 while still maintaining Azure AD Join and MDM enrollment.

Microsoft first announced this with 1709 as automatic redeployment, and said remote triggering would be available in the spring. Then remote triggering was pulled from 1803, but reappeared in insider build 17672 and was announced June 7th as Autopilot Reset.

Devices will retain the region, language, and keyboard settings, and connect to Wi-Fi using the network credentials provisioned prior to the reset.

This means that we can use the group we created earlier, based on graduation year, to automatically reprovision a set of devices!

When new students arrive after the summer they can log on to a fresh device in a managed and secure state, and all Intune needs to do is push any apps or profiles unique to the user or grade.

This example utilizes the Microsoft Graph to instruct the Intune service to reset one or more devices in a certain way. I will not cover the authentication part of working with Graph, but you can find the functions used in this example in Microsofts Github repository for powershell Intune samples.

First we need to construct a payload with the wipe instructions.

# construct JSON object (body) for wipe instructions
$payload = @{
keepEnrollmentData = $true
keepUserData = $false
}
$body = $payload | ConvertTo-Json

The object will look like this:

{
"keepEnrollmentData": true,
"keepUserData": false
}


We will then get the users from the dynamic group we created earlier, and the Device IDs of any devices they have enrolled in Intune. We use the Device ID to construct a URI, and trigger the wipe action using the Invoke-RestMethod cmdlet pointing to that URI together with the authToken as well as the JSON payload from the last step.

$users = Get-AzureADGroup -SearchString "Graduates 2021" | Get-AzureADGroupMember
foreach ($user in $users) {

# get user id (Intune device ID is not the same as Azure AD device ID)
$id = (Get-AADUser -userPrincipalName $user.UserPrincipalName).id
# get id from device registered to user
$DeviceID = (Get-AADUserDevices -UserID $id).id
if ($DeviceID) {
# construct uri
$Resource = "deviceManagement/managedDevices/$DeviceID/wipe"
$uri = "https://graph.microsoft.com/beta/$($resource)"
# reset device
Write-Host "Performing reset on device $DeviceID" -ForegroundColor Yellow
Invoke-RestMethod -Uri $uri -Headers $authToken -Method Post -Body $body

}
else {

Write-Host "User has no registered device" -ForegroundColor Cyan
}
}


The URI should look like this: https://graph.microsoft.com/beta/deviceManagement/managedDevices/7345bdbf-1f17-4b59-85e7-ac2e545d776c/wipe

And this is the result in our demo environment:

2018-06-24 13_38_20-Task Switching.png

We had two students fitting the description, you can see the first one didn’t have a registered device, but the second did.

We can see from the Intune console the action automaticRedeployment is now pending (status will change to completed when the device has registered back into the service).

2018-06-24 13_39_22-Task Switching.png


If a user is logged on they will first receive a toast message, informing them a restart is scheduled in 45 minutes for automatic redeployment.

2018-06-24 13_41_43-Task Switching.png

35 minutes later they will get a popup message counting down, warning that Windows will shut down in 10 minutes.

2018-06-25 08_28_27-Remote Desktop Manager [hyperv].png

When the device is reset and ready for a new student they will see the message above on the login screen.


Needless to say, you can customize the above script to better suit you environment, maybe you need to reset all devices in a particular school or you have some other criteria.

Microsoft Graph EDU

To sum’ up, when using School Data Sync, a set of extension attributes can be made available. Combine that with the power of the Microsoft Graph, and you can automate anything from application delivery to redeployment of Windows 10 devices, freeing up valuable time for IT and educators.

#TeamsEduTurns1 with loads of new announcements!

June is great month to release new functionality in EDU tools, when school is out in large parts of the world. In this post I will introduce you to some of the latest announcements from Microsoft, and discuss what this means in education.

TeamsOneYear.png

But first, lets take a moment to reflect on the past. Teams for Education just turned one year, and what a year it has been!

Classrooms all over the world are experiencing transformation, students are given a voice, and inclusive and engaging learning environments have been created.


New features

Let’s have a look at some of the features announced lately.

Page locking

First up is one that I know educators have been longing for. Page locking in OneNote Class Notebook is finally rolling out. Not only that, using Teams teachers can set pages to automatically lock when the assignment hits the due date!

Rubric grading

Another common request has been for students to be able to see how they’ll be assessed upfront, before starting the assignment. With rubric criteria and skills-based grading Microsoft introduces that, while also saving teachers time allowing them to easily grade multiple assignments at once.

Rubric grading is the first feature brought to Teams for EDU with the hiring of Chalkup co-founder and CEO Justing Chando.


Forms in assignments

Another great addition to assignments in Microsoft Teams will be the posibility to add a Form to a new assignment. As soon as the student returns the form it can be graded automatically and the score as well as any feedback will be written back to the grade book.


Reuse a team as a template

Reusing an existing team as a template when creating a new one was announced a while back, let’s see what that actually looks like.

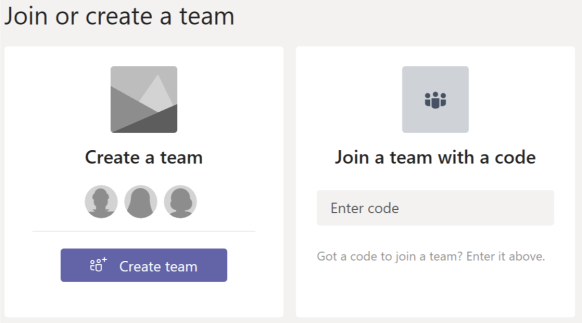
First click Join or create a team.

Join or create a team.png

Choose create team.

Create team.png

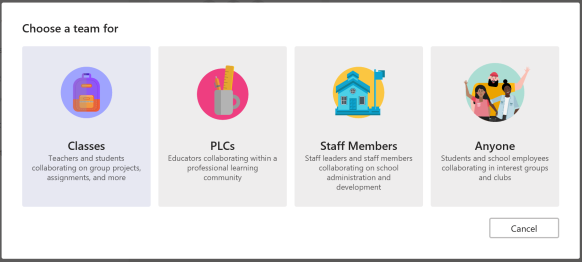
Pick a team type.TeamType.png

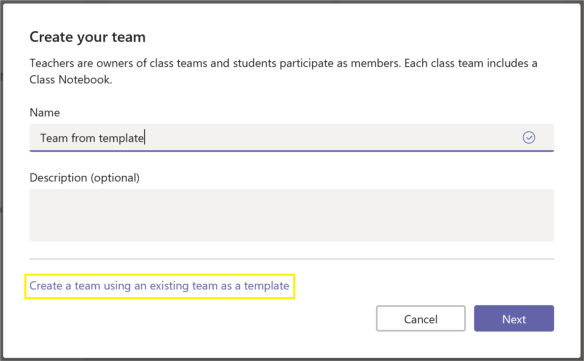
Give the team a name and choose Create a team using an existing team as a template.

CreateYourTeam.png

Next up you will have to choose which team to use as a template.

WhichTeamAsTemplate.png

And then choose what to bring over from the existing team.

WhatToBringOver.png

At this time you can choose to bring over channels, tabs, team settings, apps and/or members. If you need to copy files you can accomplish that from within the SharePoint document library.


Join codes

Join codes was also announced a while back and should be rolling out in the coming weeks. This will enable educators to easily get a group of students into the team by sending them a code.

To get the code, the teacher needs to hit the three dots (…), also known as more, followed by Manage team, and then Settings. They can then generate a code under Team code.

GenerateTeamCode.png

You will be presented with a code…

code.png

…that you can copy and send to students or other invitees.


Invitees will have to choose to join or create a team, followed by Join a team with a code.

Join_a_team_with_code.png

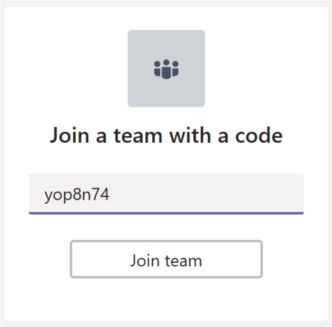
Unsuprisingly entering the code and hitting Join team will take them to the associated team.

JoinTeam.png


Archive teams

This is a big one. While we obviously need to automate this in larger environments, archiving teams is a welcome feature entering end of school year. This feature will according to Microsoft let you safely store your team content in read-only mode to use as a reference while setting up your Teams experience for the next school year.

Let’s have a look at how this could look, in the not so distand future.

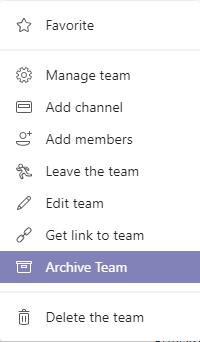
In the Manage teams page you could get an overview of all your teams, click … (more) followed by Archive Team.

ArchiveTeamMenu.png


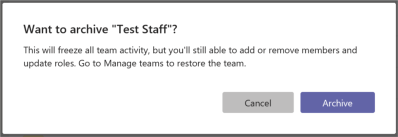
Hitting the Archive button will, well… not surprisingly archive the team.

Archive.png

All team activity will be frozen, or read-only, while you’re still able to add or remove members who might need access to team data.

Once archived you will have the option to restore or delete the team.

Archived.png


For more information about these lates announcements, see the Microsoft Education blog post.


The people behind the success

Before we move on with even more news, I would like to both congratulate and give thanks to some of the people behind this amazing product.

TeamsTeam.png

This is a picture of the Teams for Education team shared on Twitter,  (hope it’s OK that I use it). Happy one year anniversary and keep up the excellent work, Teams rocks!


Uservoice

Last but not least I thought I would update you on some of the latest updates coming from Uservoice. For those who are not familiar with Uservoice, it’s a product feedback platform that allow Microsoft and others to prioritize feature requests and gain insights into customers wishes and requirements.

You can either vote for an idea or feature request or you can submit your own if your request doesn’t match one already registered.

Microsoft Teams in general has a uservoice at microsoftteams.uservoice.com, and there is a collection of education related uservoice sites at edu.uservoice.com. Microsoft Teams for Education has a dedicated UserVoice, let’s have a look at some of the recent updates.

It is important to know that even though a feature request could be tagged with ie. plannedworking on it or partially done, Microsoft does not give any guarantees as to if and when it will actually surface within the product.


Integrate Assignments with calendar

2018-06-06 09_26_27-Innboks - Magnus.Sandtorv@horten.kommune.no - Outlook.png

This feature will insert assignments info into students Outlook calendars, effectively enabling them to easily see whats due when.


Add ability for Parents/Gaurdians to view assignments, etc.

2018-06-06 09_30_17-Innboks - Magnus.Sandtorv@horten.kommune.no - Outlook.png

Parent insights is crucial and while I would prefer a more comprehensive parent portal a weekly email digest is certainly a welcome addition.

Those who require more learning tools integrated with Teams, such as a parent portal or an app with attendance, week plans and more, can get this today with 3rd party tools like Skooler.


Bring the waffle menu into teams online experience

2018-06-06 09_39_07-Innboks - Magnus.Sandtorv@horten.kommune.no - Outlook.png

While not a big thing, easy access to other tools in Office 365 is good for usability.2018-06-06 09_40_55-(2) Chat _ Microsoft Teams.png

2018-06-06 09_43_39-(4) General (Åsgården skole) _ Microsoft Teams.png
The waffle will only be available while using Teams in the browser.


Ability to prevent students from editing files

2018-06-06 09_45_19-Innboks - Magnus.Sandtorv@horten.kommune.no - Outlook.png

Making sure students don’t remove their homework from the week plan or accidentaly remove important information from within a document shared in the team has been a top request by teachers since the release of Teams for Education, and it now looks like it’s finally coming.

Teachers could accomplish something similar today by adding files or folders from an external SharePoint document library, where permissions are separate from those within the team. It is however a cumbersome process so baking this into Teams makes perfect sense.


Different assessment grade/points formats

2018-06-06 09_51_11-Innboks - Magnus.Sandtorv@horten.kommune.no - Outlook.png

Custom grading like pass, fail etc. is also something that teachers have been requesting for some time.


Make sure to follow the uservoice links to vote, and leave your email address if you would like to be updated with any changes in status going forward.


That is all for now, If you like my work please share in social media and or in the comments below.

New assignments features in Teams for Education

In this post I will show you the recently announced assignment features in Teams for Education.

 assignments.png

In a recent blog post on Microsoft Tech Community,  Microsoft Education Principal Program Manager Justin Chando just shared some great news for education users.

You can now post assignments to individuals or small groups, schedule assignments for later, allow students to undo their turn in and allow teachers to return an assignment with feedback so that students can keep on improving it.

Some of you might remember that I demoed the latter, the assignments return flow, in my session How to Deploy and Use Teams for Education in Your School District, during the Learn Teams Conference in the beginning of April.

Nevertheless, let me walk you through the new features one by one.


Assign to individuals or small groups

Often times you have students working in groups, or an individual or a subset of the class with special needs. Instead of giving the same assignment to the whole class…

2018-05-09 20_50_54-General (Test Class) _ Microsoft Teams.png

…you can now assign one that is custom made, reducing outsideness.

2018-05-09 20_36_56-General (Test Class) _ Microsoft Teams.png


Schedule assignments for later

Another feature that has been longed for by educators is the possibility to schedule an assignment. While you have always been able to create a draft, to manually publish when ready, it surely fits the organized educator even more to be able to create assignments in advance to release on schedule. You can now accomplish this, literally by the flip of a switch.

2018-05-09 21_06_52-General (Test Class) _ Microsoft Teams.png


The assignments return flow

Educators wanting to practice formative assessment are now in luck, let’s see how we can accomplish this in the latest update of Teams for Education.

First, we need to create and publish an assignment. Below we have set a due date, allowed late turn-in, attached some instructions and added a word document for the student to turn in.

2018-05-09 21_20_33-General (Test Class) _ Microsoft Teams.png

When a student turns in the assignment…

2018-05-09 21_22_11-Microsoft Edge.png

…he or she will have the possibility to undo the turn in for further improvement.

2018-05-09 21_22_23-Microsoft Edge.png

Students can turn in and undo submissions as many times they need until the due date.


Often times though, it is the teacher who would like to return an assignment with some feedback, to encourage students to improve even further.

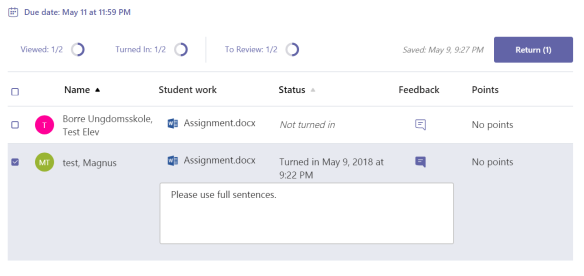
2018-05-09 21_50_17-General (Test Class) _ Microsoft Teams.png

Teachers can return the assignment to one or more students with some feedback, which will let the student(s) know with a notification. The status will change to returned, showing the date and time.

2018-05-09 21_56_36-General (Test Class) _ Microsoft Teams.png

And there is more!

The announcement also showed rich text editing for assignment instructions, where educators can bold, highlight and more.

2018-05-09 22_11_40-5 New Assignments and Grading features in Teams for Education - Microsoft Tech C.png

The above screenshot was copied from the original blog post, as this feature was not flighted in my preview tenant at the time of writing.


  Turn in celebrations

Last but not least for assignments are turn in celebrations. It’s obviously not a huge feature, but it will encourage some students for sure, which in itself is important.

celebrations.gif


This is all I can share for now, but rest assured, more great features will surface in Teams for Education before the summer is over!

If you enjoy my work, please share in social media or comment below. Same thing goes if there is something you think I should blog about, thank you for reading.

Automate Teams for Education with School Data Sync

In this article I will show you how to setup School Data Sync to automate your Teams for Education environment, as well as discuss the benefits and highlight some important considerations.SDS.png

School Data Sync, from Microsoft, is a free service in Office 365 Education. It takes data about Students, teachers, class rosters and more, from the Student Information System, and use that data to create and license users in Azure Active Directory and Office 365, create classes in Microsoft Teams, complete with teachers and students, and more.

2018-03-29 16_29_15-Welcome to the 2018 Learn Teams Conference.pptx - PowerPoint.png

School Data Sync, or SDS, integrates with 78 Student Information Systems at the time of writing. For Student Informations Systems not on the list, chances are you could still make it work, which I will discuss in a second.

But before we move on, I’d like to continue with why you should setup School Data Sync. First of all, Classes in Teams won’t necessarily update dynamically if you create them manually and add a group from Azure AD. When new students arrive, teachers will have to add them to every team. Same goes for students moving from one school to another.

If you have more than a few schools, you really don’t want teachers or IT admins spending the first week after summer break moving students in and out of classes in Teams.

School Data Sync also lets you get the term start and end dates from the Student Information System, which you could use to automate archiving of classes End Of Year.

There are a whole range of other use cases when SDS is up an running, like dynamic application delivery if you manage school PCs with Intune for Education, but that’s a story for another day.

window-App-deploy.png

Most Student Information Systems integrating with systems like Learning Management Systems, have the option to do so using XML files in a format like IMS. School Data Sync however, if you’re not using the API, require six CSV-files in a proprietary format.

CSVs.png

Microsoft has a set of example CSVs on Github, which I have customized slightly below.

2018-03-29 16_57_03-_new 1 - Notepad++.png

The above examples show the bare minimum of what you need to get started with SDS, there are however a range of other properties you could add which I will cover later.

You should have all this information in the SIS XML file, so all you need to do is to create a script or small piece of software to parse the data in the XML file into six CSVs that SDS accepts.

When you have these CSVs, you’re ready to start syncing your Student Information System with School Data Sync. Let’s have a look at how you can accomplish that.

First you need to navigate to sds.microsoft.com and log on with global admin credentials. You can there click add a profile…

2018-03-29 17_41_15-Microsoft Edge.png

…give it a name, choose to upload CSVs in SDS format and click Start.

2018-03-29 17_42_31-Microsoft Edge.png

If your users already exist in Azure AD, choose Existing users. Otherwise, and you would need to have usernames and passwords in the teacher and student CSVs, choose New users and the service will provision accounts on your behalf.

2018-03-29 17_45_45-Microsoft Edge.png

Click Upload Files followed by Add Files, browse to and choose your CSVs and hit Upload.

2018-03-29 18_05_59-Microsoft Edge.png

Select school and section properties, remember that these must exist in the CSV files. As a bare minimum you need SIS ID and Name for schools and SIS ID, School SIS IS and Section Name for sections.

2018-03-29 18_08_39-Microsoft Edge.png

ProTip: Term StartDate and EndDate could come in handy later for automation purposes.

When all that is done, you have the option to replace unsupported special characters that may exist in the files, to make sure that the synchronization doesn’t stop just because of a dollar ($) sign or a dash (/).

You can also choose whether or not section group display names should persist when changed by the teacher, and set a date for when students should be able to view their classes.

2018-03-29 18_20_14-Edit Post ‹ Teams.rocks — WordPress.com.png

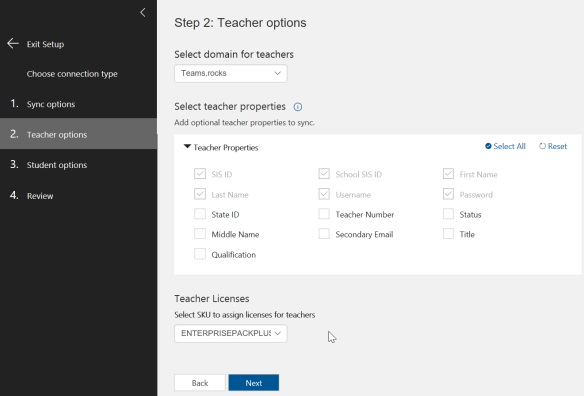
Select the domain, properties and licenses for both teachers…

2018-03-29 18_21_21-Microsoft Edge

…and students. And hit Next.

2018-03-29 18_21_48-Microsoft Edge

The last page will let you review all your settings and finally create the profile. Setting everything up til take a few minutes.

2018-03-29 18_25_31-2018-03-18 14_42_38-LearnTeamsConference - School Data Sync - [InPrivate] ‎- Mic.png

When complete choose Start Sync.

2018-03-29 18_25_49-2018-03-18 17_25_30-Microsoft Edge.png ‎- Photos.png

Refresh the page after a while, please bare in mind that a sync like this can take some time, depending of the amount of users and groups you are syncing.

2018-03-29 18_26_05-2018-03-18 17_40_21-Microsoft Edge.png ‎- Photos.png

When the sync is complete, choose Your Organization in the menu on the left, and pick your school to see what has been synced.

2018-03-29 18_36_06-Microsoft Edge.png


You can also open either the Office 365 admin center and search for the teacher, students and classes…

2018-03-29 18_33_55-Microsoft Edge.png

…or of course just open Microsoft Teams with a teacher account to see that everything is OK.

2018-03-29 18_40_35-Microsoft Edge.png

You can see the classes are created, as well as teacher and students, and we’re good to go.

One thing I think is important for a successful roll out though, is to consider whether you should create class teams, subject teams or a mix of both. You need to discuss this internally before you setup School Data Sync, since your decision most likely will affect the configuration.

My experience is that it gets complex for the youngest students if they are assigned many teams, which is why teachers in lower grades sometimes rename one team to something like “Class 2B” and then add one channel for each subject.

This however introduces a few other challenges. The built-in assignments app is team centric, there is no way to add a math assignments tab in the math channel and so on.

Also there is currently only one class notebook for each team, if the class notebook is used a lot it could end up very large causing sync issues.

My point is that you need to think about these things before you roll out hundreds or perhaps thousands of teams, in order to avoid a bad user experience for students and teachers.

Make sure to also check the Microsoft Teams release notes, since these issues might have been resolved by the time you read this. You can also vote for the ability to add existing class notebooks on UserVoice, which would be a huge step in the right direction.

Again, if you appreciate my work please share on social media or comment below, and if there is something you think I should write about please let me know!

Learn Teams Conference 2018

Just a heads up to those of you who would like to learn more about Microsoft Teams.

On April 3-7 there will be a free online conference dedicated to Microsoft Teams, featuring brilliant Microsoft MVPs, MIEEs, Experts… and ME! 🙂


I will talk about How to Deploy and Use Teams for Education in Your School District, and cover stuff like automated class management using School Data Sync and how to organize staff teams to increase collaboration.

I will also show you how to distribute assignments into OneNote class notebook, as well as demo how a few great 3rd party tools integrate deep into Teams to deliver a unique learning experience.


So if you’re not to busy (if you are that is actually no excuse, you can just buy unlimited access) please register at LearnTeamsConference.com to join me and all the other great speakers for what is going to be a fantastic community event.

Hope to see you there! 🙂

Teams + Skooler, better together – part 2

In Teams + Skooler,  better together – part 1, readers were introduced to Skooler and shown how their absence and assignments tools integrate with Microsoft Teams. Today I will show you their Dashboard tab, the Week plans tool, and give you a sneak peek of the newly released Skooler app for parents.


2018-03-17 18_23_04-Microsoft Edge

In the above screenshot I am logged on as a teacher seeing the Dashboard tab in expanded view. In the menu on the left you have access to all the learning apps from Skooler, and on the right you have a nice overview of todays absence, expiring assignments and more.


While access to a dashboard like this is nice, I prefer tabs focusing on spesific tasks. Let’s check out Skoolers Week plans tab for Microsoft Teams!

2018-03-17 15_26_10-Week plans _ Skooler (usa)

Opening the Skooler Week plans tab within the class team will give you a nice overview of published plans, or week letters as Skooler calls them in this view. You get a simple list with columns for title, week, date and time published, the document attachment itself as well as the groups the letters themselves belong to.

2018-03-17 15_29_39-Microsoft Edge

Clicking the New week letter button will allow you to create and publish a new week plan, I won’t go into great details but you need to add a title, choose week number and the number of weeks the plan is for, as well as uploading the actual week plan document(s) and add any links to online resources as well as learning goals.

2018-03-17 16_31_16-Microsoft Edge

If one or more students have individual week plans, there is also an option in the bottom to remove students from the pre populated list.

The actual week plan document is typically created in Word based on a template and uploaded by clicking Upload week letter.


When the week plan is published it will be available for students within the class team (below image) as well as in the parent app.

2018-03-17 16_59_39-General (Grade 8th MrsBowen) _ Microsoft Teams and 1 more page - [InPrivate] ‎- .png

Student view of the week plan.

Teachers can also edit any existing week plans, as well as unpublish and then delete it.

2018-03-17 16_24_37-Microsoft Edge


Skooler Parents app

The Skooler Parents app is available on iOS and android and as usual you download and install it from either the App Store or Google Play. My demo is based on the iOS version using an iPhone.


The first time you launch the app you will need to search for and pick your school.

ParentAppChooseSchool


The app will open in the Assignments view, giving you a nice overview of next weeks assignments followed by coming assignments.

IMG_0049 2018-03-17 16_34_02

If you click the name of the child you will be able to select another child if you have more than one at the same school.

IMG_0051 2018-03-17 16_33_58


Clicking an assignment will open it in details view, where parents can see the title, due date, grade scale, what subject the assignment is in as well as a description.

IMG_0061


Navigating back and into the Assesments tab assessments from earlier assignments are available.

IMG_0050 2018-03-17 16_34_02


Opening an assessment gives you a similar view as for the assignment, but instead of the description you see the grade and a comment section with feedback from the teacher.

20180317_170012890_iOS

Choosing Weekplan in the menu in the bottom gives you list of week plans.

IMG_0052 2018-03-17 16_34_02


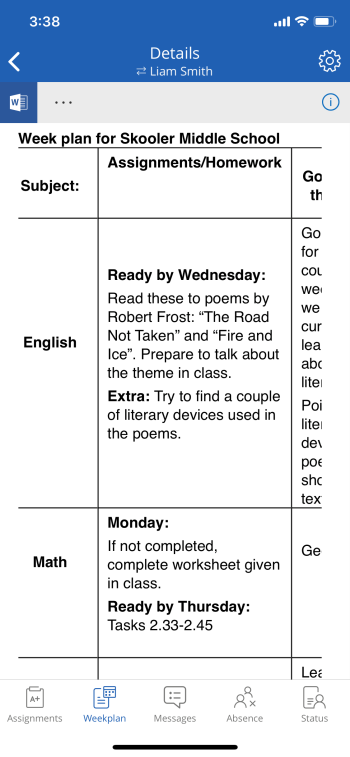
Click one to see the details, these are the same as we saw earlier in the Week plan tab within the class team.

IMG_0053 2018-03-17 16_34_02


If you click the attached document the app opens it in a Word Online view. Unfortunately it doesn’t scale that well, and there is no pinch to zoom, so you will need to scroll a bit in order to see everything.

IMG_0054 2018-03-17 16_34_04


The app also has messages, there is no dedicated Skooler messages tab for Teams as of this writing, but you can reach it from within the Skooler Dashboard tab (shown in the beginning of this post).

IMG_0055 2018-03-17 16_34_02


Click to open a message.

IMG_0056


A huge limitation of the messages feature is that parents are only able to read messages, and respond to actionable messages with a predetermined set of answers like yes or no, not write their own. There is an option to email the teacher, but two way messaging would be much better and could potentially eliminate the need for a dedicated messaging service.


Absence is a feature known from Teams + Skooler,  better together – part 1, in this view parents get a nice overview of their childs absence with any comments added by teachers.

IMG_0057 2018-03-17 16_34_03


Last but not least is the Status page, giving a summary of reviews, assessments and more.

IMG_0058 2018-03-17 16_34_04


That wraps up this second part of Teams + Skooler, better together. I hope to write more about Skooler when they release more learning tools in Teams, and also plan to write about other learning tools vendors integrating with Microsoft Teams in the future.

If you appreciate my work please share on social media or comment below, and if there is something you think I should write about please let me know!

Teams + Skooler, better together – part 1

So you’ve started using Teams for Education, but miss features for attendance, weekly plans, individual learning plans (ILP) and parent insights? In this blog post I will show you how you can supplement Microsoft Teams for Education with learning management tools from Skooler.

Skooler-logo

Thougt Microsoft Teams could replace your current learning management system?

That depends on what you require for managing learning, many will however need more than what is currently available out of the box.

The good thing though, if you have already chosen Microsoft Teams as your hub for teamwork and collaboration, is that one of its true strenghts is the way partners can integrate deeply into the service with supplementing features like those listed above.

Let’s see how one partner, LMS provider Skooler, make their tools available inside class teams.

Skooler-features

Skooler consists of a dashboard and tools for attendance, weekly plans, assessment, ILP, student progress, assgignments and a parent portal.

At the time of writing the Skooler app for Microsoft Teams is in version 1.1, and includes a dashboard tab as well as tabs for absence, assignments and weekly plans. Tabs for the rest of their tools are scheduled for release in April this year.

The Skooler app is avalable in the Teams store. You can install it either by clicking the … button (show more) in the left toolbar and choose More apps.

In the store searchbar type schooler, and select the Skooler app.

search-for-app

Or, even easier, is adding it as a tab directly in your team of choice. Just hit the plus icon…

add-tab-plus

…and search for Skooler.

add-a-tab-skooler

In the Skooler app dialogue you will be able to choose the appropriate tab type and give it a name.

Skooler-app

Absence

In this example I chose Absence, and hit Save.

Absence-eng-subject

Absence_types

Opening the tab will give you an overview with the students attending the class, and any absence already registered.

In the above screenshot you see the absence tool in the context of a particular course. It is however also available to add for the whole class, ie. in the General channel of a team organized with subjects as channels, showing absence from all subjects.

A grey circle is someone who has no absence registered, click once and it turns green which is documented absence, yellow is undocumented and blue is leave of absence. You also have the option to get a sneak peek of the full week (ie. to quickly see if a student was absent earlier in the week), and a description field on the right.

As you see above you get a minimal set of features, just enough to get things done, while not cluttering the view with unimportant details.

I’m often when demoing features like this, asked why teachers shouldn’t instead use the full plattform (in this case the Skooler web portal). While that certainly is a viable option, that would mean they either need to switch between two platforms or loose out of the superior collaboration features of Microsoft Teams. In my opinion Microsoft Teams should be used as a hub, connecting students, teachers and all their tools. Day to day tasks should be available through the Teams interface, together with the option to switch to fully featured apps or the original web portal for those who prefer, or need, that.


Students also see the Absence tab, but during my testing this led to the Skooler dashboard, not a student view of absence.


Skooler Assignments

While Teams for Education has an assignments app built in, this is quite basic in the current version (version 0.2), and lack the possibility to tie an assignment to learning objectives, curriculum etc. For those who prefer teams with subjects as channels, Skooler Assignments also has a lot more flexibility in the way that you can add different assignment tabs to different channels within the same team.


Let’s see what Skooler Assignments looks like within the class team.

When navigating to the Skooler assignments tab you will get an overview of recent assignments as well as buttons to create a new assignment or do a quick assessment.

Assignments-eng

Opening an assignment will give you a nice overview of the status of the assignment, like how many students has returned the assignment and how many has been assessed. You will also see a nice real time graph of the distribution of grades.

Assignments-open-eng

You can click to open the turned in document to review, or choose from a rich set of grading possibilities, add comments to the student, add internal comments just for teachers as well as read the students self-assessment.

Another nice feature with Skooler Assignments is the possibility to return a turned in assignment to a student with a comment, at any given time, allowing them to correct errors, adjust course or just give it a little more effort while continuously learning in a formative way.

Assignments-options-eng

You can also unpublish the assignment, expand the due date and more. If you need to check for plagiarism you can do that with the click of a button, Skooler integrates with both Urkund and Turnitin.

Skooler also has an app for parents, allowing them to gain insights into assignments with assessments, week plans and absence, as well as receive actionable messages from teachers.


That’s it for the first part of Teams + Skooler, better together. Stay tuned as I plan to cover more integrated learning tools in an upcoming post, as well as the Skooler bot and the parent app


In the mean time, for more information, head over to http://teams.skooler.com/

Consumer Guest Access for Microsoft Teams

In this article I will show you how to add guests not subscribing to Office 365 to your teams, discuss why this is a big deal, and show you what this looks like both for you while inviting and for those invited.

VideoConfImage

Let me start with why consumer guest access is a big deal. Up until now we have had guest access for users with a user account in Azure AD, which is the user catalog used in Office 365 and other Microsoft Cloud Services. While there were 120 million Office 365 users six months ago, the majority of those are business users.

Continuing with the education scenario, most parents certainly don’t have Office 365, and many school districts use GSuite or other services. Now that anyone with an email address can be invited into Teams, think about what that potentially could do to parent involvement and the school home relationship!

Or what about inviting coming educators from the nearby university, and teachers from other districts to collaborate on curriculum, tests, projects and more?

Teachers could create a team and share curriculum and weekly plans with parents, they could send messages using chat, publish announcements in coversations, have discussions with regards to school trips, get feedback using polls etc.

Looking forward this could be used as part of a parent portal, and when private channels become available parents could easily also be invited within the class team itself.

Consumer guest access certainly opens up a range of opportunities, let’s see how it works.

Let’s invite a guest

First navigate to the team where you want to invite guests, hit … (also commonly refered to as show more) and choose Add members.

Add_members

Fill in an email address and click the purple box below.

Add_members3

You should edit the display name by clicking the pencil and correcting the name to avoid getting usernames as display names.

Admins can also edit user information using the Azure Active Directory portal, but these changes won’t come into affect immediately due to the way Teams sync and how the different clients caches such information.

Add_members5

When the display name is updated, send the invitation by clicking the Add button.

Add_members6

Team members will see a message informing that someone has been added.

AddedToTeam

What about those invited?

Moving to the recipient end, those invited will receive an email with a link leading them into the account creation process if their email address isn’t already a Microsoft Account.

AddedAsGuestMail

Click the button Open Microsoft Teams (above), then Next (below) to begin the account creation process.

LoginPage

You will be asked to create a password followed by a few personal details. The username will be the email address you were invited with.

In the next step you will be propted to enter a verification code, which will arrive in your inbox.


A captcha makes sure you are not a bot, and you should be forwarded to Teams.

JoiningAsGuest

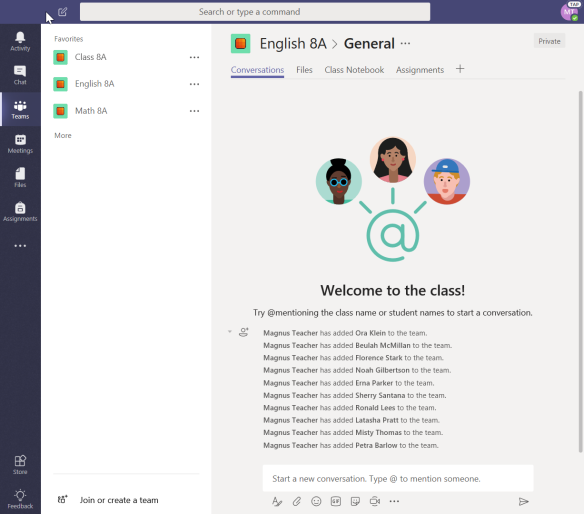
Inside the team guest will have a familiar experience, with conversations, files, chat etc.

ParentEngagement

Well, what are you waiting for? Start inviting those guests and take collaboration to the next level with Microsoft Teams.

Guest Access in Teams on Android

Want to switch tenants, to check on teams where you are a guest, while working on a mobile device? Read on…

TeamsOnMobile

While the biggest news lately regarding guest access, definetly was the announcement about guest access for consumer accounts (anyone with an email address can now be invited to join your team), another nice feature I was recently made aware of is switching tenants on an android device.


Not much to it, let’s dive right in…

First open your Teams app and hit settings in the upper left corner.

Settings


In the settings menu expand Your accounts.

ExpandYourAccounts


You will get a list of available guest accounts.

GuestAccountList


Pick a guest account and you will be signed into the appropriate tenant.

InGuest


There you are, enjoy your guest access on the go! That is if you have an Android device, since iOS isn’t supported as of this writing.

UPDATE March 14th: Tenant switching is now available also in the Microsoft Teams app on iOS.

Be productive on the go with Teams mobile apps

In this short tutorial I will show you how you can be productive on the go, using Microsoft Teams mobile apps.

TeamsOnMobile

During the past year or so I’ve been using Teams more and more, communicating with my team, writing technical documentation and tutorials, answering Office 365 related questions from educators and more.


While the mobile apps used to have some weaknesses, recent updates enables you to be almost as productive on a train, at the beach, or anywhere else outside the office.


On iOS, version 1.0.30 of the Teams app enabled us to share text, pictures and files from other apps in Teams.


We’ve also for quite a while been able to do video conferencing from mobile devices, both on iOS, Android and Windows Phone.

TeamsMobileAvailability

Following the education scenario, students working on a natural science project could take pictures of tree leaves, insert them into a private chat with their classmates in the same group to discuss things like what tree it’s from, and then finally save it into their class notebooks or a Teams assignment.


Let’s see what that would look like.

IMG_1068


Take a picture, open it in Photos and hit the share button in the lower left corner.


IMG_1070

Attach a message and hit Select in the lower right corner.


Search for and choose either a channel or a classmate as a recipient, once finished click share (see the above screenshot).


Choose whether or not you want to compress the image to save space, and the picture with the message is sent to the recipient.

IMG_1076

To learn more about how you can add images, text or documents into an assignment, please see my recent post about Assignments in Teams mobile apps.

Also, if you’re an admin wanting to perform administrative tasks on the go, make sure to check out my post Managing Teams on the go (like a boss…).


If you think this article has room for improvement, or you simply enjoy my work, please leave a comment below, hit the like button or share in social media.